Bright Light
Winn Hardin, Contributing Editor
The recession presents a number of challenges for the automotive industry. Just two years ago,automotive glass manufacturers were adding capacity, particularly in China. The picture has changed dramatically. Now there is over-capacity. As suppliers fight for orders, manufacturers feel pricing pressure. Therefore, factory productivity is a key strategy as the automotive glass industry emerges from this recession.
The use ofautomated optical inspection is one of the tools that can be employed to improve factory productivity and guarantee higher quality. Recently, one of the world’s largest manufacturers of automotive glass, Saint-Gobain, looked to glass inspection machine-vision specialist, SynergX Technologies to develop a system that could inspect both the surface and edges of automotive glass.
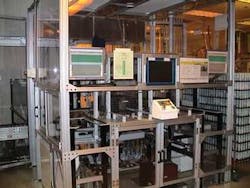
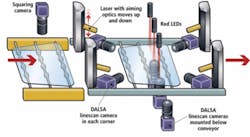
SynergX developed a brightfield inspection system that uses eight linescan cameras: one to determine the position of the glass as it enters the inspection station, another four cameras with laser line generators and movable targeting optics to inspect the edges, and another three cameras with red LED line generators to inspect the surface of the glass. Initial results show that the system is able to detect 100% of automotive glass with defects, allowing the customer to sort between glass that can be reworked and glass that needs to be returned to the supplier (see Fig. 1).
null
Bright to dark
SynergX originally designed its Auto Glass Inspection (AGI) system using a combination ofbrightfield and darkfield imaging. Brightfield detects intensity changes caused by defects absorbing transmitted light passing through the glass, while darkfield imaging finds defects that reflect off-axis illumination rather than absorb it.
By moving from laser line generators to red LED lights with special optics and improving noise filtering via dedicated image-processing routines that run on an FPGA inside the system’s compactPCI industrial computer, the AGI now uses just brightfield illumination.
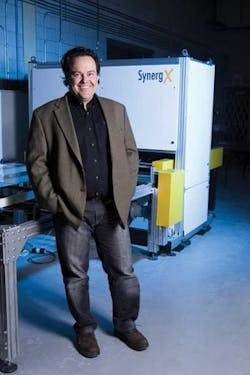
“Darkfield inspection is not optimal for factory environments because of its sensitivity,” explains Ken Wawrew, president and CEO of SynergX. “Since you’re not in a cleanroom environment, any dust particle is picked up by a darkfield system. By using filters, we can find the defects and classify them easier using our enhanced brightfield inspection routines.”
Grinding along
The AGI system is installed after the cutting of glass, grinding of edges, and subsequent washing station but before paint bands are applied to the edge of the window. Because each inspection station is fed by four grinding stations, Saint-Gobain wanted the machine-vision system to track where each piece of glass came from and notify operators when one grinding machine created excessive amounts of defects, thus cutting down on waste and boosting productivity.
Because the glass is not stamped with a serial number, the easiest solution was to connect an operator interface to the vision system that tracked defective parts. The system showed the operator where defects are located on each window and allowed the operator to determine whether the glass can be reworked or not.
Before an inspection routine begins, the operator creates a computer model of the glass to be inspected. The glass window is run under the first of AGI’s cameras, which collects an image of the glass and presents it to the operator on a nearby desktop PC. The operator can segment the glass into different sections, each with its own maximum, borderline, and minimum defect size, as well as determine what types of defects are acceptable and which are not.
For instance, a shiner (a missed area of grinding) on the edge of a window is unacceptable, but it may be possible to repair the edge and save the glass; a bubble or stone in the middle of the glass is scrap. When the operator initiates the inspection system, the model identifier for that particular product is sent from the PLC to the vision system. The PLC also operates the vision station’s conveyor so that the line can be run in bypass mode should the vision system require maintenance.
Light on the edge
As a window exits the washing station, it passes under the AGI’s first DALSA Piranha2 2000-pixelCamera Link linescan camera. This “squaring camera” is mounted above the conveyor line and collects an image of the glass as it moves underneath at constant speed. The images are passed along a Camera Link cable to one of two custom-made I/O boards inside the Pentair compactPCI industrial computer, which performs all the processing for the machine-vision system.
The image passes through an Altera FPGA mezzanine board attached to the GE Fanuc single-board computer with an Intel dual-core processor. The FPGA performs filtering functions on the image and then runs blob analysis to determine the x, y position of the glass on the conveyor. This information will be used to split the window into four quadrants for edge inspection.
The glass continues into the AGI inspection enclosure. In each corner of the enclosure, SynergX mounted a 6000-pixel Piranha2 Camera Link linescan camera with Fresnel lens so that they are aligned parallel to the glass edge. A laser line generator illuminates the edge of the window as it passes through the inspection station.
Each camera will inspect a portion of the edge for shiners, chips, and other defects. The portion is determined by the AGI system based on information collected by the squaring camera.
Since the edge detection creates a surface map based on how the laser light deflects from the edge, the distance between laser light, glass edge, and camera must be known. To stay within a set area, mirrors are mounted on four vertical towers placed in each corner of the AGI inspection station. Based on the window’s edge location—as determined by the squaring camera—the mirrors are moved up and down to maintain an equal distance between laser, edge, and camera (see Fig. 2).
null
Clearer now
While the edge inspection is in process, three red LEDs withFresnel lenses from Edmund Optics turn the diffuse LED light into a bright line that shines down on the glass as it passes below on the conveyor. Below the conveyor, SyngerX mounted three more 2000-pixel Piranha2 Camera Link cameras to capture the transmitted light.
Each camera/LED pair can inspect an area up to 400 mm across, hence the need for three cameras to capture the entire window as it moves through the inspection zone. Above each camera is another Fresnel lens that collects the light and focuses it onto the linear array.
Again, images are sent line-by-line to the compactPCI computer and filtered for noise on the FPGA mezzanine board. Using pixel-intensity information, the AGI system searches pixels for values that fall within three ranges: acceptable, defective, and borderline.
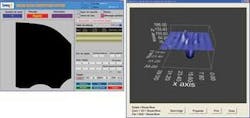
When potentially defective values are located, the FPGA performs a blob analysis and histogram of the blob to determine whether the defect is large enough to be a defect and, if so, what type of defect. Based on the size, type of defect, and location within the window, AGI makes a final determination whether the defect is acceptable, failed, or borderline (see Fig. 3).
The vision system stores defect statistics and images locally on a hard drive and displays them on a separate operator’s PC located next to the reject station. The display shows each window in the defect accumulator in order, with defects highlighted in green for acceptable, yellow for borderline, and red for fail.
Company Info
Altera, San Jose, CA, USA, www.altera.com
DALSA, Waterloo, ON Canada, www.dalsa.com
Edmund Optics, Barrington, NJ, USA, www.edmundoptics.com
GE Fanuc, Charlottesville, VA, USA, www.gefanuc.com
Pentair Electronic Packaging, Schaumburg, IL, USA
www.pentair-ep.com
Saint-Gobain Sekurit International, Paris, France
www.saint-gobain-sekurit.com
SynergX Technologies, Laval, QC, Canada, www.synergx.ca
features, advantages, benefits
In a highly price-sensitive business, the Auto Glass Inspection system provides quality information for incoming windows so that glass window manufacturers can go back and get credit from suppliers for defective glass.
“The SynergX autoglass inspection systems have become an integral part of our production processes. The systems not only improve our product quality but increase our production line yields. Just as important is the service and support that SynergX provides our factories worldwide.”
—Stephane Artaud,
Engineering Director
Saint-Gobain Sekurit
International


