Machine vision speeds auto-parts inspection
Andrew Wilson, Editor, [email protected]
Cold extrusion is a process used in the manufacture of many automotive parts. Before the parts can be assembled, however, they must undergo rigorous inspection to determine whether any surface defects or geometric deviations exist. While conventional approaches may use machine-vision systems programmed to analyze specific defects, these systems are inefficient when small batches of very different parts must be examined.
To address the task of geometric deviations, the Fraunhofer IPA (Stuttgart, Germany; www.ipa.fraunhofer.de) has developed a system that uses known good models of parts and compares them with image data from parts under test. In this way, the system can rapidly learn the surface profile of new parts. A defect-surface map of the part under test can then be displayed.
“To deploy this system in a production environment,” says Markus Hüttel of Fraunhofer IPA, “parts are first fed from a linear conveyor and placed onto a rotary table by eight grippers that hold each part in place. By indexing the rotary table in 45º increments, each part is successively positioned under an imaging station. To obtain a surface map of the part under test, the part is illuminated with a Lasiris line laser from StockerYale (Salem, NH, USA; www.stockeryale.com). Using a motorized stage at the base of the imaging station, the part is rotated, and several hundred images of the reflected laser light are captured by a Ranger C camera from Sick IVP (Linköping, Sweden; www.sickivp.se). From the gray-scale images the camera extracts the laser line of highest intensity and transfers this 2-D information to a host PC using a Camera Link frame grabber.
“Because the displacement and angle between the laser and camera system are known,” says Hüttel, “it is possible to use the profiles captured by the camera to determine the distance at which the laser light meets the surface of the part.” This calculation is performed by the host PC using a Camera Link frame grabber. The 3-D data are represented in the PC memory as a linescan intensity data stream, except that the pixel value corresponds to height instead of gray scale.
Once captured, the linescan intensity data are compared with information from a known good part using Fraunhofer’s host-resident machine-vision software-EMSIS. The resulting pseudocolored image is displayed on the monitor of the host PC.
“In many applications,” says Hüttel, “it is also necessary to capture a visible image of the part so that specific defects such as cracks can be analyzed.” To accomplish this, the Fraunhofer system also incorporates a linescan camera from Schäfter + Kirchhoff (Hamburg, Germany; www.sukhamburg.de) that captures brightfield images of the part as it rotates. Gray-scale image data from the camera are digitized by another PC-based frame grabber (also from Schäfter + Kirchhoff), and the image data are reconstructed in the PC as a visible surface map of the part under test. The software, also developed by the Fraunhofer IPA (DefDetect), is based on texture analysis and detects defects on structured surfaces.
“By using two cameras,” says Hüttel, “it is possible to compare a very-high-resolution surface map of the part and its corresponding visible image on the same display. To let OEMs take advantage of the DefDefect surface-reconstruction software in the system, Fraunhofer offers a DLL that can be used with the Institute’s own EMSIS machine-vision software package. This DLL will also be offered in other commercially available machine-vision packages, including Neurocheck from NeuroCheck (Remseck, Germany; www.neurocheck.com) and Coake from Sirius Advanced Cybernetics (Karlsruhe, Germany; www.sac-vision.net).
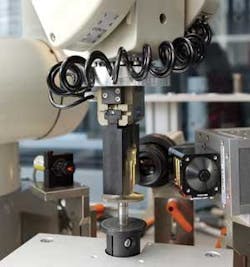
At the Fraunhofer IPA, a variation of the system also has been developed that replaces the linear conveyor and rotary table with a RV/3AL robot from Mitsubishi (Ratingen; Germany; www.mitsubishi-automation.com/robots.html). Designed primarily for demonstration purposes, the robot’s motor controllers are manipulated from the system’s host PC over an Ethernet interface using Mitsubishi’s MELSOFT programming interface.
“By using a robot instead of a fixed rotary table,” says Hüttel, “the system can be adapted for applications where parts oriented at random may need to be positioned in fixed inspection stations for defect analysis.”

