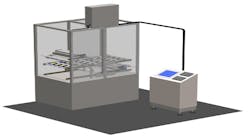
Dot-scribe marking imprints readable 2-D Data Matrix codes quickly and cost-effectively on hard, soft, and rough surface materials.
By Andy Habedank and Len Dorazio
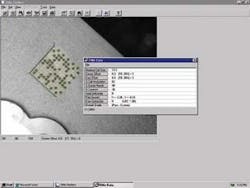
The first truly two-dimensional (2-D) barcode was introduced by Intermec Corporation in 1988 when it launched Code 49 for use in small packaging applications in the health-care industry. Since that time, a number of other codes have been developed or have been redesigned to meet the need for placing a database in as little space as possible. One of the most common 2-D codes in use today is the Data Matrix code from RVSI Acuity CiMatrix, designed to pack a lot of information in a very small space (see Fig. 1 and cover). Many industries are looking to this code to provide the added, machine-vision-readable information not possible with barcodes.
A Data Matrix symbol can store between one and 500 characters. The symbol is also scalable between 1 mil square and 14 in. square, theoretically permitting 500 million characters to the inch. Practically, density is limited by the resolution of the printing and reader technology used. The data on this code are a compilation of data based on a square matrix broken down into a series of smaller squares or cells that can be square, hexagonal, or circular. Data are encoded by the position of the light and dark areas. Compared to one-dimensional barcodes, the 2-D Data Matrix code is really a database. It accurately provides information density sometimes 2000% greater than a barcode can provide.
The 2-D Data Matrix codes can be applied to surfaces utilizing the complete range of printing technologies, including ink jet, dot matrix, lithography, lasers, and chemical etching-and now by dot-peen marking. As well as being scalable, in terms of physical size, the Data Matrix codes can be rotated up to 360° without affecting readability-a huge advantage over barcode technology.
At the forefront of this technology has been the creation of image-recognition systems to effectively and reliably read the 2-D codes on a variety of surfaces, as well as certain subsequent manufacturing processes such as bending, cleaning, and painting. Limitations include space availability, issues of contrast, reader requirements, and ultimately cost. However, with vision scanning, the technology is now available to read most types of imprinted codes.
Direct-Part-Mark Verification
The Association of Automatic Identification and Data Capture Technologies (AIM) symbology specification calls out the Data Matrix verification methodology as the measure of symbol contrast, print growth, axial nonuniformity, and unused error correction. A final grade of the mark quality is the lowest grade given in these categories. The AIM method follows what was done for barcode verification many years ago and validates printer quality.
With parts that are directly marked, the AIM method misses several key measures and will almost always report a final score based on the symbol contrast score, with the result that the score of most directly marked parts will be very low and meaningless because it is not something that can be controlled. For example, dot-peened marks on a metallic surface seldom add much contrast. If companies rely exclusively on AIM parameters, they will likely fail completely for readable marks and accept some marks that will later prove to be unreadable.
With ink jet, dot peening, and laser marking (the three most often used methods for marking Data Matrix codes on parts), the two most important aspects to measure are the “normalized” center offset and size offset values. These measures are made of all the “ON” cells (those actually marked vs. the spaces left unmarked) within the borders of the code. The scores are “normalized” because with a Data Matrix code, if all cells are shifted the same amount or are smaller or larger by the same amount, there is nothing to adjust. This is because most readers will deal with the scale change and no marker maintenance is necessary. However, if there is a difference in cell position within the coder, there is an indication that service is needed. The same is true for size offset where “ON” cells of a matrix would be the same size and a variation in size could indicate, for example, pressure problems on a dot-peen marker and possibly power-management issues.
One of the marking processes that enables expanded use of 2-D codes on actual parts is dot scribe marking. The Columbia Marking Tools Richter line of high-speed Unigrav markers can produce clear and precise Data Matrix codes by dot scribe marking. A recent test conducted by the HTE Vision Lab concerning the reliability of dot peen marks on cast-aluminum surfaces showed that the Columbia Richter Unigrav machine is highly reliable in producing consistently readable marks on rough surfaces. Tests were conducted in accordance with NASA STD-6002 and NASA HDBK-6003.
Mark Analysis
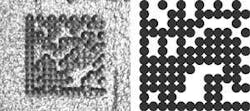
The HTE Vision Lab successfully read the dot-scribed Data Matrix codes on a cast-aluminum automotive part with both RVSI fixed-station HawkEye smart cameras and portable hand-held MXi readers. The purpose of the tests was to supply automotive manufacturers with relevant information about the marking and reading of dot scribe marks on cast surfaces, ultimately aiding in the production of quality marks that can be read with both fixed-station and hand-held readers without difficulty. For example, the dot-peen 2-D code produced by the marking system was successfully read 10 out of 10 attempts on a rough aluminum casting using the MXi hand-held reader (see Figs. 2 and 3).
The 2-D code produced by the Unigrav was easily readable, even though it was tested with a mark that had cells that were slightly underprinted. Ideally, the cells should be touching. Two approaches could be taken to improve the mark. The data cells could be spread closer together, creating a smaller data matrix while maintaining the current cell size. Or, the cell size can be increased so that the cells are just touching, maintaining the current data matrix size. The cells can be made larger by increasing either the marking pressure or the gap between the stylus and the part (see Fig. 3).
On cast surfaces, larger cell sizes tend to read better. The NASA Technical Standard NASA-STD-6002A, 5.1.9 states: “Cast surfaces present a unique symbol decoding challenge because the surface irregularities (pits) create shadows that can be misinterpreted by the decoding software as dark data cells. Consequently, individual data cells in the symbol must be larger than the surface irregularities so that the decoding software can differentiate between the two features.” In this case, there appears to be sufficient room on the marking pad boss on the aluminum part to produce a larger data matrix so the individual data cells are touching.
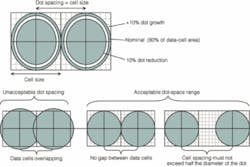
The nominal shape of a dot-scribed data cell is circular. Dot spacing is the horizontal or vertical distance between center points of contiguous cells. Dot spacing should be equal to the cell size or a printed Data Matrix symbol. The dot diameter should be 80% of the dot spacing to allow for a dot-size tolerance of ±10%.
In addition, dot spacing should be adjusted to ensure that the individual data cells touch or are in close proximity to each other. Gaps that exceed 50% of the dot size will adversely affect symbol readability. As a result, data cells should not overlap (see Fig. 4).
The decoding of machine-vision-readable codes on most castings is difficult because of surface roughness. On rough surfaces direct-part-mark readers cannot distinguish between light and dark cells. Two-dimensional optical readers use the discrimination of cells to determine 1s and 0s to decode information contained in the marks.
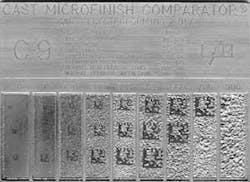
On rough surfaces, cells should be made as large as possible to overcome the confusion of light reflections that are returned to cameras from irregular surfaces (see Fig. 5). Overall symbol sizes should not exceed the available FOV of the cameras used to decode the mark. NASA marking standards dictate that many of the available marking processes not be used on cast surface parts that exceed defined roughness levels. The NASA standard states that cell size must increase in direct proportion to the average surface roughness of cast parts. That is, the rougher the surface, the larger the cell size needs to be to ensure proper decoding, especially with hand-held readers that do not have the light adjustment capabilities of fixed-station cameras.
For part surfaces with varying roughness, dot scribe marking of Data Matrix codes appears to be the best method; however, the use of vision-based verification, both fixed and hand-held, after marking is necessary to confirm that mark quality requirements are met.
Andy Habedank is application engineering manager at Columbia Marking Tools, Chesterfield, MI, USA; www.columbiamt.com, and LEN DORAZIO is project engineer at HTE Vision Lab, Auburn Hills, MI, USA.
Company Info
Association of Automatic Identification and Data Capture Technologies,
Warrendale, PA, USA
www.aimglobal.org
Columbia Marking Tools,
Chesterfield, MI, USA
www.columbiamt.com
HTE Vision Lab,
Auburn Hills, MI, USA
RVSI Acuity CiMatrix,
Nashua, NH, USA
www.rvsi.net
