At the SPIE Defense & Security Symposium (Orlando, FL, USA; March 2008), Markus Tarin, president of MoviMED (Irvine, CA, USA; www.movimed.com) presented an infrared (IR) system for nondestructive testing of aircraft fuselages. Developed by Automation Technology (Trittau, Germany; www.automationtechnology.de), the JetCheck system uses a variant of IR thermography known as “lock-in” thermography to analyze samples under test. In this method, the sample to be tested is heated at its surface by an intensity-modulated source. This heat penetrates into the interior of the sample as a thermal wave, and any change in the properties of the sample material such as cracks cause a change in the propagation characteristics of the wave.
After the thermal wave is reflected to the surface of the sample, it becomes superimposed (or locked in) onto the initial wave such that any defect is revealed by a local change in the phase angle. By recording the surface temperature of the sample with an IR camera, the temperature-time function of the image can be analyzed on a host computer. By calculating a phase image, the internal structure of the component and its interior defects are revealed. Depending on the modulation parameters of the heat source during the measurement, different depth ranges within the image can be displayed.
“Aircraft hulls are manufactured using a variety of different materials and fasteners such as aluminum and rivets, carbon-fiber-reinforced plastics, honeycomb structures, and other composite materials,” says Tarin. “Due to constant temperature changes, pressurization and depressurization, vibration, and high wind loads, material fatigue occurs. This can cause deriveting, impact damages, cracking, and hull delamination. Other factors such as condensate and water inclusion can also cause cracks at high altitudes.”
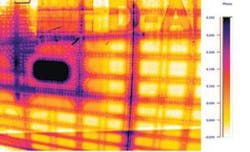
To check for these defects, the JetCheck system inspects several square meters of an aircraft within minutes (see figure). To do so, the exterior is heated to no higher than 40oC using an array of high-power halogen lights so as not to cause damage or deformation to the fuselage. The halogen-lamp array is modulated with a sinusoidal waveform. The system measures and evaluates differences in the temporal behavior of the heat at the object surface, and defects appear with excellent contrast. “The advantage of using lock-in thermography with phase-angle image evaluation is that external effects, such as emissivity of the material and sunlight, do not affect the results of the measurements,” says Tarin.
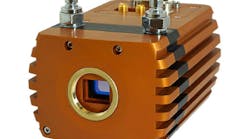
In the JetCheck system, thermal images are captured by a ThermoVision SC 6000-HS cooled focal-plane-array (FPA) IR camera from FLIR Systems (N. Billerica, MA, USA; www.flirthermography.com). Using a 640 × 512 InSb FPA, the camera transfers 120 frames/s, 14-bit digital images to a PCI-based Camera Link frame-grabber board resident in a host PC running Windows XP. Developed by Automation Technology, the IR FlashLink frame-grabber board also contains the circuitry for generating the sinusoidal stimulus signal to the halogen-lamp array and performs the synchronized IR-image recording.
IR NDT application software, also developed by Automation Technology, running on the PC allows for test setup and phase and amplitude thermal-image analysis. The software also stores live images from the camera in real time and calculates the phase image from the IR data.
“The increasing number of air travelers combined with a greater number of aging commercial jetliners has led to more stringent inspection and maintenance procedures. Inspection methods that can detect minute defects that could lead to catastrophic failure are required to keep air travel safe,” says Tarin. After official approval by the US Federal Aviation Administration (FAA; Washington, DC, USA; www.faa.gov), lock-in thermography is now being used by companies such as Lufthansa Technik (Hamburg, Germany; www.lufthansa.com) to perform aircraft fuselage inspection.
“Research in lock-in thermography was first studied by Lufthansa Technik in 2001,” says Peter Feddern, Lufthansa NDT engineer.. Since gaining acceptance by Boeing and the FAA, it has been used for inspecting the bonds between the skin panels and the inner structures of the fuselage on the Boeing 737. This ensures that no cracks will appear that affect the safety of the airplane. One complete inspection takes approximately 100 hours. This represents a time-saving of about 1000 hours.”

