Vision system enhances inspection of automobile parts
Vision system enhances inspection of automobile parts
John Haystead
Contributing Editor
In the automotive and automotive-parts industries, the production rate, manufacturing environment, and composition of raw materials all markedly affect the quality and yield of the final product. As a result, auto manufacturers have been early adopters of machine-vision systems
and technologies seeking to match their quality-inspection capabilities to those of their precision manufacturing tools.
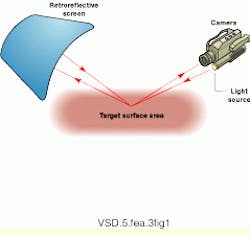
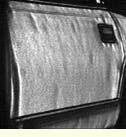
Once such machine-vision system is the Diffracto Ltd. (Windsor, Ont., Canada) D Sight system, which converts variations in surface curvature to changes in light intensity using a patented optical-image-enhancement technique (see Fig. 1). It is capable of inspecting a reflective surface, or a surface that can be made reflective, and measuring surface anomalies to a few microns. Among its applications, D Sight is used by automobile manufacturers and auto-parts manufacturers to analyze dings, dents, wrinkles, and other defects on metal, plastic, and glass parts, such as fenders and doors, as well as to identify tooling irregularities (see Fig. 2).
Image capture
The AS-2 Audit Station is a fixed-location version of the D Sight system. The standard AS-2 station consists of a general-purpose, 12-ft inspection booth that contains a high-resolution, integrated D Sight CCD camera mounted on an industrial camera stand. An adjustable table, capable of supporting parts weighing as much as 200 lb, provides repeatable, precision parts positioning in the camera`s field of view.
Parts are initially placed in front of the system`s retroreflective screen and are then illuminated with a white light source. According to Diffracto account manager Dave Willie, D Sight can use conventional halogen as well as light-emitting-diode (LED) light sources, but he makes a distinction between the use of broad- or point-source light. "Because we`re doing full-field, as opposed to structured-light, imaging, we need to control the intensity of the light to provide adequate, but not excessive, definition," he says.
Therefore, when the system is used to examine plastic parts, a point-source light (made up of a single bulb or a small LED array) is used because it provides a sharper defined image when examining deformations such as waviness. In contrast, when the system is imaging sheet-metal parts, a broad-source light (typically made up of ten bulbs or a large LED array) is used because it slightly flattens the resultant image and reduces the amount of illuminated detail to usable levels.
As noted by Willie, the desired level of definition varies by project as well as by material. In standard production quality-control applications, for example, "car makers are basically trying to identify only those flaws that can be seen through very close visual inspection by the unaided eye," he explains. In other research-and-development applications, however, such as at GE Plastics (Pittsfield, MA) and Chrysler Corp. (Warren, MI), greater levels of detail are needed to evaluate and compare the defect rates generated by the processing of various formulations of raw materials (see "It`s not just the parts, it`s the process," p. 36 and "Vision system solves Chrysler quality puzzle," p. 39).
Although the D Sight camera provides a zoom feature, it is used only to fill the frame with the image of the part. The system requires no lens-based optical magnification. Instead, magnification of local deviations is created by the D Sight two-path phenomenon, where light bouncing off a retroreflective screen comes back to impinge a second time on the part before entering the camera. The total area being examined can vary from 6 x 6 to 1 x 1 sq ft.
The AS-2 D Sight camera is a conventional Cohu Inc. (San Diego, CA) analog, CCD monochrome video camera that has been modified by Diffracto with a custom 0.5-in. CCD array. Eight-bit gray-scale images are captured with 512 x 512 pixels at a standard 30-frame/s rate and transferred over an RS-170 link to a frame-grabber board from Imaging Technology Inc. (Bedford, MA). All additional image processing is handled by a Compaq Computer Corp. (Houston, TX) Deskpro 2000 Pentium II, 200-MHz computer running Microsoft Windows 95/98 software.
System setup
To configure the AS-2 Audit Station system in a practical application, operators must initially select a representative high-grade part that serves as a baseline reference or master. This part is repeatedly imaged under various angle and lighting conditions to obtain the best possible views. All of the physical imaging parameters are recorded into the system`s setup software so that all follow-on parts inspections can be conducted under the same conditions.
According to Willie, although production schedules may vary, parts are typically brought to the inspection station from a manufacturing line once every hour or every few hours. "Because some parts require that multiple areas be examined during each inspection, and in many operations multiple lines are running simultaneously, this process generates a fair amount of throughput," notes Willie, "but once a part has been initially set up for inspection, the actual process takes only a few seconds."
The AS-2 user interface is a menu-driven Windows 95 application program. According to Willie, several software-adjustable parameters allow operators to control the level of system sensitivity, such as adjusting the pixel count or averaging images over a few frames or as many as 100 frames. The operator can also set the limits at which the system will indicate a defect.
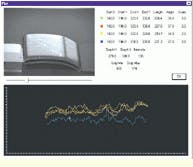
Software-controllable camera functions include zoom, iris, light level, and focus. The system software automatically stores and recalls camera settings as well as any special filtering routines for each test setup. Once the part is properly positioned on the precision table, the operator selects the appropriate macro algorithm to perform the parts inspection (see Fig. 3).
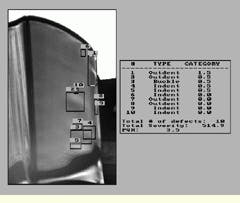
The amount of processing required for an individual inspection can vary greatly, depending on the part and the specified parameters. The system contains approximately ten different algorithms, or filters, that can be operator-applied. For sheet-metal-parts inspection, for example, the system`s "metal" algorithm examines the entire field of view for indents, outdents, buckles, and dings at designated frame rates; each parameter is compared with to a predesignated severity index (see Fig. 4).
Alternatively, the system`s "mask" feature allows operators to select a particular point on the part`s image on which to run specific algorithms. Says Willie, "Although we`ve found that the untouched D Sight image is often adequate for many surface-inspection tasks, the goal is to give operators the ability to present the images in the most efficient way for their application."
In addition to the user-interface monitor, the AS-2 provides two, 19-in. gray-scale monitors for displaying the D Sight imagery (see Fig. 5). Multiple monitors allow the operator to directly compare the object under examination with the stored master image. The AS-2 can also import images into compatible TIFF-format desktop-publishing systems for report preparation. It also includes modem hardware and software for the transmission of images and data over standard telephone lines.
For future AS-2 systems, Diffracto is considering automating the positioning of the system`s precision table using computer-controlled servomechanisms, similar to those used in the camera setup. The company is also working with a North American automobile manufacturer to develop an in-line D Sight system that will provide 100% inspection of body-in-white assemblies, which automatically identifies and locates all sheet-metal defects requiring repair.
It`s not just the parts, it`s the process
GE Plastics (Pittsfield, MA) is using the Diffracto AS 2 Audit Station to characterize and improve its existing manufacturing processes as well as to help develop and evaluate new ones. GE supplies plastic resin for body panels such as fenders, doors, and quarter panels to several automobile makers.
The GE Performance Characterization Group supports the entire automotive parts-manufacturing operation by helping customers analyze each manufacturing process from product design through processing, as well as examining the materials used relative to the number and severity of generated defects. According to GE applications specialist Ron King, the company has made surface inspection using the AS-2 system one of its key initiatives.
King says, "Although there are some commonalities with steel parts, plastics may also introduce different kinds of defect possibilities." For example, because plastic parts are primarily injection-molded, defects such as waviness and flow or knit lines can be created where materials come together through poor processing. "We use a large number of D Sight algorithms to help our customers examine and quantify the severity of these various defects," says King. One algorithm, called "plot," can draw a single line across a defect for detailed analysis. Another algorithm, called "feature," can provide "almost a wire-grid representation" of the defect area.
GE has been using an AS-2 system since 1987, and its internal studies have shown it to be a time-saver over other inspection techniques. "We looked at scanning microscopes and profilometers, both of which take more time, and either can provide limited information or inspect a much smaller area," says King. Last year the company upgraded to the automated camera/Windows 95 version of the AS-2, which King says has further simplified the inspection process. "Because it automatically stores all the settings, the next time you go back to the part, all the camera and physical settings are already in your file," he states.
King also notes that the new system has better graphics and printing capabilities, and he expects to further investigate the system`s Internet/intranet connectivity. "We`re currently doing some work for one of our organizations in The Netherlands, and I hope to be able to transfer this data through the network."
Although GE uses the AS-2 precision table and stand, the company also builds its own support fixtures for securing parts during examination to ensure consistent positioning relative to the camera. Part sizes can sometimes be more than 4.5 ft in length and, "because we`re doing detailed comparisons, we need to make sure that the part position, as well as everything else, is consistent throughout the testing," says King.
Several automotive manufacturers also use the D Sight system as a quality-control tool for acceptance of plastic body panels. One common cut-off point for waviness severity is a reading of 200 or above on the gray-scale severity scale, which, says King, is the point where defects are likely to be visible to the naked eye. For his purposes, King says, because the current Diffracto system only provides this relative severity reading as opposed to a specific height or depth measurement, its use as a quantitative analysis tool is limited. "Actual defect-measurement data would be extremely valuable as additional information for our performance-characterization program."
Vision system solves Chrysler quality puzzle
The Chrysler Corp. stamping facility in Warren, MI, uses the Diffracto AS-2 Audit Station to inspect the surfaces of metal body panels made for the Dodge Minivan, Jeep Grand Cherokee, and T300 and Dakota trucks. As described by Joe Butler, system operator in the facility`s quality-control department, multiple parts (such as doors, hoods, and fenders) of five different body styles are evaluated weekly, and detailed records are maintained of each manufacturing line`s performance.
Chrysler has been using the AS-2 station for nearly five years, and, according to Butler, the vision system has repeatedly helped him pinpoint the source of random quality problems, particularly in new designs. For example, Butler recalls one case where a distortion was discovered in the window channel of one of its assembled-door operations. "Initially everyone was convinced the problem was being caused by the tab-bending machine, but by using the audit station we were able to show otherwise," he says.
To troubleshoot the source of the distortion, Butler first divided the total manufacturing process into the individual operations performed on the part and then carefully examined the part after each step. "We could literally watch the signature (defect-severity index) gradually climb at each stage, but then it suddenly jumped up 100 points from the previous inspection," he states.
As it turned out, the problem was caused by a handling robot just prior to a follow-on robotic welding process. "We couldn`t see it in automatic mode, but when we manually slowed the system down, we saw that the robot was slightly skimming the window channel surface causing a bend. The welder would then come in and bend it back into place, resulting in the distortion," says Butler. Chrysler was able to fix the problem with a minor readjustment to the handling robot, bringing the total part severity index down from 200 to between 70 and 80 index points.
Repeatability of testing is a major issue for Butler. The detail level at which Chrysler is evaluating product-quality variations is demonstrated by the fact that his greatest repeatability concern is the cleanliness level of the kerosene/oil-based highlight fluid used to enhance the reflective sheen of metal surfaces before inspection. "This is the only variable I have now in the system. I control the light, the temperature, and everything else with repeatable fixtures, to the point where the cleanliness levels of the highlight fluid have the greatest impact on the consistency of results. Without precautions, each application can add one to two severity points to results," he adds.
To minimize these deviations, Butler currently premixes and strains the fluid before using it, in addition to carefully wiping down the part surface between applications to remove any buildup. He notes that the Diffracto system also includes a software trigger feature that "helps compensate for the problem somewhat."
Butler is also working on his own initiative to develop an indexing system for the AS-2 precision table. "Given some of the part geometries, some areas of interest just can`t be made totally visible to the system camera no matter how you mount your fixture on the table," he says. The indexer will incrementally turn the table around during the inspection so that the entire surface can be imaged in one pass. "This will allow us to much more easily see the entire radius of a part such as a hood or fender," says Butler.
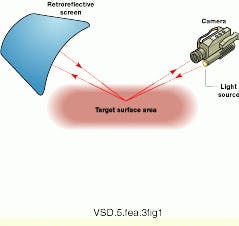
FIGURE 1. D Sight uses a patented optical-image-enhancement technique to convert variations in surface curvature to changes in light intensity. It is capable of inspecting a reflective surface, or a surface that can be made reflective, and measuring surface anomalies to a few microns.
Figure 2. Image of a sheet-metal door-panel inspection reveals deformities that are clearly visible to the D Sight imaging system, but are invisible to the naked eye.
FIGURE 3. Plot displays comparative gray-scale readings along individual lines of interest drawn across a D Sight image (top). Differently colored lines indicate four different plot lines, either from different locations on the same image or the same location on four different images (bottom).
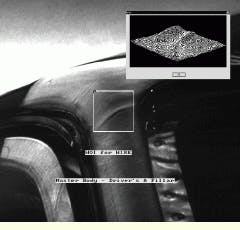
FIGURE 5. The imaging-system`s "Wire" algorithm is applied to a particular window of interest to generate an x, y representation of the surface topography based on gray-scale pixel values.
FIGURE 4. The imaging-system`s "Metal" algorithm scans an entire D Sight image, highlights defects, and assigns a severity index value.
Company Information
Cohu Inc.
San Diego, CA 92123
(619) 277-6700
Fax: (619) 277-0221
Web: www.cohu.com/cctv/vs
Compaq Computer Corp.
Houston, TX 77070
(281) 370-0670
Fax: (281) 514-1740
Web: www.compaq.com
Diffracto Ltd.
Windsor, Ont., Canada N8T 3B7
(519) 945-6373
Fax: (519) 945-1467
Web: www.diffracto.com
GE Plastics Inc.
Pittsfield, MA 01201
(413) 448-7110
Web: www.ge.com/plastics
Imaging Technology Inc.
Bedford, MA 01730
(781) 275-2700
Fax: (781) 275-9590
Web: www.imaging.com
