By Andrew Wilson, Editor
In mobile telephones, subscriber identity modules (SIMs) with on-board processors and memory store personal phone numbers, text messages, and value-added services. When installed within mobile devices, SIM connectors from companies such as Amphenol (Wallingford, CT) make contact with the SIM card and the internal electronics. Featuring solder pins at both ends, the body of the connectors is only 2 mm high, making them well suited for slim and compact products where the card remains in a fixed position.
Automated inspection
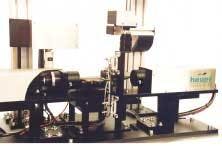
"Because of the manufacturing volume of the SIM connectors," says Helmut Kohl, engineering manager with heuer Automation (Denkendorf, Germany), "automated inspection processes, such as our company's custom SIM inspection system, must rapidly inspect a large number of parts" (see Fig. 1). Automated inspection systems must inspect the height of each pin on each connector, as well the coplanarity of the pins. At the same time, these systems must also inspect the surface alignment of the top of each pin. "In addition to checking the coplanarity of the pins to better than 5 µm," says Kohl, "the system must check parts at rates to 225 per minute. This necessitates performing up to 75 checks per minute on three parts at a time," he adds.
null
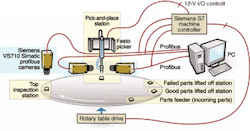
To automate this process, heuer Automation engineers use several off-the-shelf lenses, frame grabbers, programmable logic controllers (PLCs), and industrial automation equipment from several vendors. Before individual SIM connectors can be examined, they are loaded in a linear fashion onto a rotary table and index drive from Weiss Sondermaschinentechnik (Buchen/Odenwald, Germany). This drive conveys individual SIM parts in a rotary or dial motion to a series of inspection stations that are positioned around the rotary table.
Stations on the Weiss index drive are typically set in circular fashion at 0°, 60°, 120°, 180°, 240°, and 300°. At these six stations, untested parts are loaded onto the drive, and the surface and contact pins are examined at stages two and three, respectively. At stages four and five, the SIM cards that have passed or failed are loaded into different bins for further processing. Station six is free for extensions. At the two visual inspection stations, contacts on both the top and the side of the SIM cards are checked (see Fig. 2). Here, the parts dwell for a fixed period of time until the visual inspection process is completed.
null
Distance measurements
To check the pins on the surface of each SIM connector, a number of linear measurements are made. "On each connector," says Kohl, "the system measures the distance between a number of pins in both horizontal and vertical dimensions." In this way, if any pin should be deformed, bent, or twisted, the dimensional check will ensure that the part is not accepted.
To image the surface of such parts presented a complex problem. Because of the tight tolerances associated with the parts, it was necessary to use a telecentric-lens-based camera system. Kohl and his colleagues chose a Simatic VS710 vision sensor from Siemens Co. (Munich, Germany). A machine-vision sensor/processor based on the Profibus standard from Profibus International (Karlsruhe, Germany), this sensor combines all the components of an image-processing system within a single housing with a 1/2-in. CCD possessing a 768 × 580-pixel resolution and running at 20 full frames/s. Including an on-board CPU for image processing and memory resident storage, the camera is capable of storing several test programs that are downloaded over the Profibus interface.
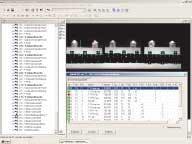
Using the Siemens ProVision configuration environment, inspection programs are generated off-line on a PC in a Windows environment and then tested and loaded onto the sensor. "By using this method," says Kohl, "several inspection programs can be stored and selectively opened through the interfaces. Parameters can be optimized on-line, as well as the teaching of connector patterns (see Fig. 3)." In this way, connector-pattern calibration data and other variables can be taught and imported through the Profibus interface. After the surfaces of parts have been inspected, the pins at the bottom of each SIM connector must be inspected for coplanarity.
null
Pin linearity
To image the surface of each connector, Kohl and his colleagues could not use conventional C-mount lenses on the VS 710 vision sensor. "Checking the coplanarity of pins on the SIM connectors is crucial, and conventional lenses are apt to produce distorted images," Kohl says. The company chose the S5LPJ2299 telecentric lens from Sill Optics (Wendelstein, Germany) to capture images across the field of view of the connector. Using this lens attached to the CCD camera enables the vision inspection system to capture images that yield constant magnification over a defined working-distance range—in this case 92 mm from the surface area of the connector.
With a magnification of 0.24, the telecentric lens allows the vision sensor to measure the coplanarity of the pins to better than 5 µm. As the contacts of each connector are inspected, results from each inspection are transmitted over the Profibus and displayed on a PC-based monitor. After each inspection has produced a pass/fail result, the parameters are stored in an S7 machine controller from Siemens.
"Although telecentric lenses allowed us to perform an exact measurement of the coplanarity of the pins," says Kohl, "to properly image the parts, special parallel LED lighting was required." The problem was to illuminate the small pins on the SIM connectors as they were placed within the field of view of the two Simatic VS710 vision sensors, each of which view the connector from opposite sides.
Parallel light from a red light-emitting diode (LED) projected from under the SIM carrier is reflected from the SIMs. In this manner, the telecentric lenses capture a linear shadow from the pins. This allows parallel light to illuminate the parts from both sides, increasing the system throughput. In addition, the parallel light passing through the lenses always represents the image independent of the distance the object is from the lens. Because each part fits within a nest as it moves around the rotary table, it needs to be picked from the nest using this illumination so that the underlying pins can be accurately inspected.
To measure the coplanarity of the pins, each Simac VS710 image sensor is again programmed using the ProVision program. Using this approach, Kohl and his colleagues developed individually tailored algorithms and ported them to the image sensor for on-line inspection (see Fig. 4).
null
Pick and place
After both inspections are performed, the Weiss rotary table and index drive rotate the known good SIM connectors to the next stage of inspection using the S7 controller. To offload the parts from the inspection system for further processing, heuer Automation engineers employed a high-speed picker from Festo (Esslingen, Germany)—a machine well suited to working in small spaces such as for the heuer Automation system design. As the table indexes to the fourth and fifth stages, the parts are then removed by two Festo pickers in a similar fashion. As new parts appear at the next stage of the process, the rotary table is again incremented and the complete procedure is repeated.
The complete system relies on the S7 as the master PLC to coordinate the number of cameras and table motions; each camera and automation process is controlled as a Profibus node on a single RS-485 cable network with local S7 I/O signals. This modular architecture eliminates the wires otherwise needed from the cameras to the S7 controller and the automation processes, substantially reducing machine production costs. To program the complete system, heuer Automation engineers added object-oriented libraries with structured code to the machine's specific control requirements.
With nearly 400 million mobile phones sold in 2001, according to market-researcher Dataquest (San Jose, CA), the market for automated component testing of SIMs and other telecommunications and automotive-based connectors is expected to increase during the coming decade. At the same time, greater demand is estimated to increase the throughput and quality of all parts in the manufacturing process. To address these demands, companies such as heuer Automation and others will likely leverage off-the-shelf machine-vision and factory-automation components to rapidly deploy custom-made inspection systems.
