Andrew Wilson, Editor, [email protected]
High-speed, low-coherence interferometry is a high-resolution three-dimensional (3-D) imaging technology with a range of nondestructive surface-inspection applications, such as dimensional measurements and surface mapping. “Fiber-based surface-measurement systems or profilometers that use this technique are based on the interference of light rays reflected in a reference and sample arm,” says Vuk Bartulovic, president of Novacam Technologies (Pointe-Claire, QC, Canada; www.novacam.com). “When the optical paths of the reference and sample arm are exactly equal, interference occurs. To obtain a profile of the part under inspection, the delay line in the reference arm is scanned creating interference pattern at the surface.”
Since the profile contains information about the spatial dimensions and location of structures within the part being inspected, a cross-sectional image can be formed by combining a series of these scans. Unlike microscope-type interferometers that cannot get to hard-to-reach surfaces because of their size, fiber-based systems are especially suited to image such surfaces.
“Traditionally, such surfaces have been measured by replicating parts using a molding process and measuring the replica using a profilometer,” says Bartulovic. “However, with a fiber-based profilometer, it is possible to measure surfaces directly without replicating the product. By using fiber-based probes and light in the near-IR range, hard-to-reach surfaces within such products as diesel injectors and gun barrels can be imaged to micron precision.”
In a fiber-based system such as Novacam’s fiber-based profilometer, light is emitted and collected by a minute probe that can be located far from the interferometer enclosure. These small-diameter probes, originally developed for biomedical applications, have been tailored for industrial inspection and comprise a reference that makes absolute accuracy measurements easier.
Since a fiber-based probe acquires only one point at a time, its light spot must be moved to acquire an entire profile or surface. These probes are used with Cartesian surface or cylindrical scanning systems that move the probe. Such scanning mechanisms are usually configured as inspection stations that move the probe in a linear and rotational fashion, depending on the application. In these workstations, linear motion is accomplished with a precisionx-y table, and rotational motion is carried out with a fiberoptic rotary joint. A PC-based system controls the motion over Ethernet and acquires data from the profilometer.
Ethernet-based motion controllers from Galil Motion Control (Rocklin, CA, USA; www.galilmc.com) are used in the system’s standard configuration, along with a high-precisionx-y table from IBEX Engineering (Newbury Park, CA, USA; www.ibexeng.com). The table is powered by piezoelectric motors from Nanomotion (Ronkonkoma, NY, USA; www.nanomotion.com) and uses linear encoders from Renishaw (Wotton-under-Edge, UK; www.renishaw.com). This allows the table to be moved in 0.1-µm steps.
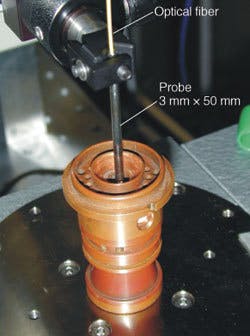
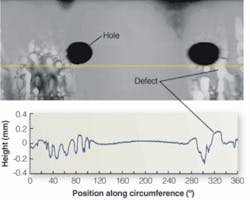
“Fiber-based profilometry is especially suitable for inspecting long narrow apertures such as the inside of a plasma torch barrel,” says Bartulovic (see figure). “To acquire the necessary high-aspect-ratio images, the probe is installed in a cylindrical scanning system. After image data are acquired, it is reformatted by the host PC as an unfolded image that represents the internal surface. Height is encoded in the brightness of the pixels with dark-to-bright gray levels representing a depth span of 750 µm.”

