Vision system inspects heads-up displays for jet fighters
To perform a final inspection on assembled head-up displays (HUDs), an automated vision system is used detect the presence of screws, bolts and covers.
Mark Smith
Heads-up Displays (HUDs) for the latest generation jet fighters encase advanced optical components within precision machined aluminium castings. At a leading UK manufacturer, these specialized units are designed, manufactured, assembled and calibrated by highly skilled technicians. Due to the number of operations required in this process, final inspection is mandatory to ensure that all the assembly tasks have been completed before the unit is shipped to the customer for integration into the aircraft.
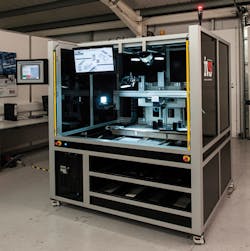
To automate this final inspection process, Industrial Vision Systems Limited (IVS; Kingston Bagpuize, Oxfordshire, England (www.industrialvision.co.uk) has developed a vision-based system that eliminates any human error associated with this task (Figure 1). In developing the system, a major goal was to provide a standardized inspection that provides objective results with minimal operator input.
Vision inspection
Vision inspection tasks were split into two categories: simple surface level inspections such as the presence of various screws, bolts or covers, and more intricate inspections that require precise lighting and camera setups to determine pass/fail criteria.
The challenge posed by the simpler inspections was not the difficulty of assessing the image against a pass/fail criterion, but the number and variety of inspections that needed to be performed across the six surfaces of the HUD unit. This was achieved by splitting the inspection process into two parts. The first part required the operator to place the HUD upside down into a nest to allow three of the faces to be inspected.
To perform inspection of the HUD, the system incorporates a gantry of cameras mounted on a linear drive that move in the z axis (Figure 2). The laser projection unit is mounted in-line with the camera to allow a single laser line to be projected into the machined holes on the HUD. In addition, white LED lighting arrays were mounted above the camera to provide overall diffused lighting for surface inspection checks. The nest was mounted on two linear drives allowing it to travel in both the x and y axes. Using this setup, any point on the three inspection faces could be presented to a camera and light module for inspection.
Once the system has indexed around all the inspection positions on the three presented sides, the nest is returned to the front of the machine, at which point an operator is alerted to position the HUD in an upright position. After the quick-release tooling is changed and the unit reloaded, the machine continues to inspect the remaining positions before returning the HUD to the load/unload position.
The machine control and human machine interface (HMI) required the user to adjust positions, configure new inspection areas and new nests for future variants without the user requiring access to the machine code. This resulted in a layout capable of displaying the key data in a clear format during inspection and providing a large number of diagnostic and configuration tools and pages accessible from the various secure menus.
Complex tasks
More complex inspections required on the HUD primarily comprised of verifying that holes had helically wound, precision formed coils of stainless steel (known as helicoils) inserted into them. To add complexity, the holes also had a shoulder part down the bore before the helicoil so differentiation was required between the shoulder and helicoil surface.
To ensure the helicoils were in place, vision inspection is performed using a combination of an IVS LED area light and an angled laser setup using a Lyte 660nm 20mW modulation laser projector from Global Laser (Gwent, UK;www.global-lasertech.co.uk) to illuminate the surfaces perpendicular to the axis of the hole. Using the area light, an initial image was first captured by an IVS NCG1300 1296 x 966 Gigabit Ethernet camera and thresholding used to locate the hole in the image. By computing the geometry of this thresholded image, small edge deviations created by any debris or swarf residing around the perimeter of the center of the hole are ignored by the vision system.
A second image, captured by another IVS NCG1300 as the laser line is projected across the hole, is then used to search within a toroid-shaped area for the presence of reflections from the helicoil surface. By using the position determined from the first image, this check can accurately account for any movement of the hole relative to the center of the image, potentially caused by the accuracy of the linear drives or variations in the HUD units and load positions on the nest.
The inspection requirement at the individual positions, whether it was to check for the presence of a bolt, cover plate or helicoil, generally required a very small field of view. This was achieved using IVS 1296 x 966 pixel CCD GigE cameras with a fixed field of view and focal distance. This approach dictated a fixed distance between cameras and part and therefore required the systems programmable logic controller (PLC) to precisely position the x, y and z axes to ensure the object of interest was located in the centre of the field of view and was in focus.
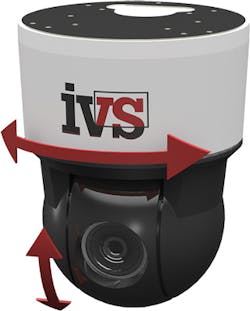
The inspection of the HUD units also required a small number of imaging functions to be performed on larger objects. These included verifying that the correct labels were applied and capturing an overview image of the unit that is archived for future reference. This requirement was met using a pan-tilt-zoom (PTZ) camera capable of capturing images ranging in size from an overview of the full 600mm long unit down to a 70mm wide area of interest (Figure 3). The IVS PTZ camera, along with the GigE cameras, structured lighting and precision laser lines, were all controlled by IVS software, a PC-based machine vision application.
Final results
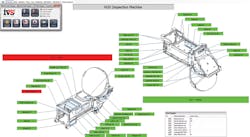
Such a complex array of inspection positions and requirements presented a further challenge in terms of displaying the final results to the operator in a usable format. Individual results for each position were collated into a report format that is automatically printed once the inspection has completed. The system also presents the data on a monitor in graphical form for the operator to visualize which tests have passed and which have failed. An overview screen shows the operator the results of groups of related types of checks for all faces of the HUD (Figure 4). If further detail is required, the operator can access additional screens of each individual face with every inspection result relating to that face displayed in a color-coded layout.
Due to the immense value of the HUD units and the fact that they are made to order, only two units were available to configure the machine. Following the installation, IVS and the manufacturer worked together to refine the vision program as production parts were run through the machine to take account of the natural variation in factors such as material finishes and colors. This was performed by remotely accessing the vision system by IVS engineers.
The HUD inspection machine has automated a long list of visual checks while allowing the operator to complete other tasks while the inspection is running. The elimination of human error and subjectivity has led to a higher quality of parts leaving the factory and the ability to keep a visual archive of every product produced.
Mark Smith, Industrial Vision Systems Ltd (IVS; Kingston Bagpuize, Oxfordshire, UK (www.industrialvision.co.uk)
Companies mentioned
Global Laser
Gwent, UK
www.global-lasertech.co.uk
Industrial Vision Systems Limited (IVS)
Kingston Bagpuize, Oxfordshire, UK
www.industrialvision.co.uk


