3D Scanner/Software Combination Inspects Beverage Cans
A global beverage manufacturer needed to inspect the pressure of cans to improve quality management and decrease short downtimes during the filling process because of, for example, faulty curvatures of a can’s surface. To eliminate these down times, optimize the process, and increase can production, the manufacturer looked to develop an application to inspect can pressure. The challenge the manufacturer faced was to inspect cans' pressure directly on a conveyor belt at maximum speed using 3D scanning. It turned to AT – Automation Technology (Bad Oldesloe, Germany; www.automationtechnology.de) and EVT (Karlsruhe, Germany; www.evt-web.com) to devise a solution.
The Process
When a consumer opens a can containing a beverage, there is a hiss—whether the beverage is carbonated or not. That hiss is no accident. It is created by ensuring the can complies with a standard that specifies the correct filling quantity and filling pressure. Filling machines carry out this process thousands of times daily. Consumers realize immediately if something isn’t right if they do not hear that hiss upon opening the can, so ensuring the correct fluid level and pressure is critical. AT – Automation Technolology and EVT Eye Vision Technology created an application that will evaluate beverage containers. It operates 24/7, scans 40 cans per second (2,400 cans per minute), and 3.5 million cans per day.
Before deploying the AT/EVT soution, the beverage manufacturer used a one-point sensor to inspect the cans, but this did not work well. The one-point sensor was far too inaccurate, which resulted in too many rejects in the end. At that time, EVT was already a supplier for this plant for standard 2D evaluations, e.g. for label position inspection, neck inspection, or scratch inspection. The manufacturer realized that EVT also offered 3D solutions and so the application for the can pressure check was developed.
The Solution
The components for this application consist of the C5 sensor and the EVT software running on a Linux computer in the plant connected to the inspection system. The data is transmitted via GigE interface.
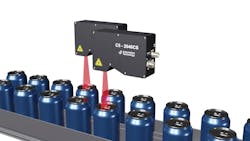
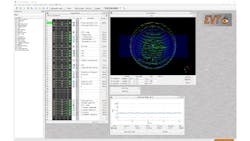
The manufacturer equipped the conveyor belt carrying the cans with a tracker for pressure control. This tracker is connected to the 3D sensor, a C5-2040CS-23-100 from AT – Automation Technology. The AT 3D sensor scans the curvature of the can lid and generates a 3D point cloud from it. The EVT software then checks the curvature using this point cloud and determines whether there is overpressure or underpressure in the can. So, this application is a pressure check using a 3D point cloud.
In the point cloud, the rim is determined first, since it is always the same. Next to the flap of the can is the highest value of the can and, based on this value, the value of the bulge is determined. There must be at least 150 µ of pressure in the can; if it is less than 100 µ, the pressure is too low, and the can must be rejected. There are tolerances within this measurement, and as soon as the value of the can curvature is outside this tolerance, the can is ejected with the help of compressed air from a nozzle attached to the side of the conveyor belt. At most, one can per day has to be rejected because of a faulty surface finish.
AT decided to use the C5-2040CS-23-100 for this application because of its 2,048 point-per-profile resolution and speed of 25,000 profiles per second. The sensor has a 100-mm field of view, which allows the sensor to react flexibly to the position of the can on the conveyor belt. It's a GenICam-compatible camera. So, the software controls the camera via GenICam and captures the point cloud, and then the software processes on this point cloud. The EVT software consists of the EYE Vision Standard software with a 3D instruction set.
There were no lighting challenges with this application. Profile measurements with laser light are very robust and there is no interference from ambient light.
About the Author
Chris Mc Loone
Editor in Chief
Former Editor in Chief Chris Mc Loone joined the Vision Systems Design team as editor in chief in 2021. Chris has been in B2B media for over 25 years. During his tenure at VSD, he covered machine vision and imaging from numerous angles, including application stories, technology trends, industry news, market updates, and new products.


