Triangulation-based 3D system measures axle diameters
Dr. Angel Dacal-Nieto
To develop a system to inspect car axles, an international automotive supplier in Spain has teamed with the Automotive Technology Centre of Galicia (CTAG) to check these parts for their length and size. The system has been designed to inspect axles mounted in PSA Peugeot Citroën vehicles but, in the future, is expected to be deployed to inspect other types of axles.
Axles that carry a wheel but without power to drive it are known as dead axles and are geometrically complex parts that provide stability and hold the weight of the car. Although the production process used to produce these axles is repetitive, the length and diameter may vary depending on the make and model of each automobile. In the past, measurement tasks were performed manually using a randomly selected subset of production batches. This sampling and further feedback from the customer were the only methods used to obtain information about the accuracy of the diameter of each part.
Compared with manual measurement, automatic inspection is faster, more objective, revisable, repetitive and often less expensive. Since contact measurement is slow and may harm the part, machine vision was chosen to develop the inspection system. Among the measurements made, the diameter of the interior cylinder is the most important and each must be measured with an accuracy of within 30μm.
Imaging techniques
Measuring the diameter of a cylinder is a task that can be performed using 3D machine vision. Three types of technologies exist for this task: stereo vision, time-of-flight and laser triangulation. While stereo vision is a passive technique that integrates at least two images obtained from two sensors from two different perspectives, time-of-flight imaging sends and receives light pulses over the part. Measuring the time between emission and reception, the distance to the object can be calculated and its shape calculated. Laser triangulation is based on projecting a known light pattern on the part, with the pattern being deformed by its geometry. Scanning a large set of profiles, the 3D shape of the piece can then be reconstructed.
Stereo vision needs at least two cameras and the calibration required is usually less robust than other options. Changing light conditions can also produce undesired results. Time-of-fight techniques, on the other hand, do not obtain the best results on specular surfaces and their accuracy is limited.
Structured lighting
Thus, in applications where a 3D profile needs to be measured, structured laser light is the method most often used. This is the method used by CTAG to measure the diameter of the cylindical axels.
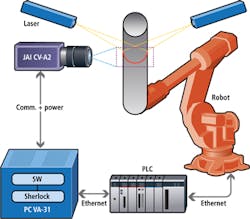
After an IRB 6600 6-axis robot from ABB (Zurich, Switzerland;www.abb.com) places the axle in a known location, structured laser light is projected onto the axle. Due to the cylindrical shape of the part, it was necessary to employ two structured laser lights to fully illuminate the part.
To digitize images from the structured laser light, a monochrome JAI CV-A2 analog camera from JAI (San Jose, CA; USA;www.jai.com) was fitted with a 35mm lens from Goyo Optical (Saitama, Japan; www.goyooptical.com) and a band pass 655 nm filter from Schneider Kreuznach (Bad Kreuznach, Germany; www.schneiderkreuznach.com/industrialoptics) to enhance the reflected laser light.
Images from the camera were then digitized and analyzed using a VA-31 vision appliance, an industrial computer from Teledyne DALSA (Waterloo, ON, Canada;www.teledynedalsa.com) that is designed to perform machine vision routines and I/O control. The VA-31 vision unit includes Sherlock machine vision software from Teledyne DALSA that provides machine vision functions and access to hardware devices such as cameras and PLCs.
Before any image processing can be performed, however, the system must be calibrated. This is performed using the Tsai method, a two-stage technique for 3D camera calibration that is used to compute the external position and orientation relative to object reference coordinate system (see "A Versatile Camera Calibration Technique for High-Accuracy 3D Machine Vision Metrology Using Off-the-shelf TV Cameras and Lenses", Roger Tsai, IEEE Journal of Robotics and Automation, No. 4, August 1987; http://bit.ly/1nshGwb).
This is accomplished by first projecting a dotted pattern onto the part. Then, by capturing the reflected image, the 3D orientation, x-axis and y-axis translation is computed and the focal length, distortion coefficients and the z-axis translation determined. This calibration data is then used to correct any distortion in the image and convert 2D points to 3D points. After the system has been calibrated, the diameter of the axle can be measured. Using the Sherlock image processing software, CTAG has developed image processing routines and additional custom code using Microsoft's .NET framework. When the structured laser light image is captured, any distortion is eliminated using the calibration data. The image is then thresholded using Sherlock to highlight the structured laser in the cylinder and the 2D points in this image are computed.
After these 2D points are detected, they are converted from 2D to 3D space using custom code and the circumference is interpolated using a least squares algorithm. The diameter of the axle is then computed.
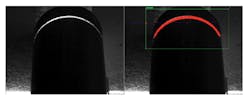
For administration and monitoring, a simple GUI has been developed (Figure 2). Figure 2 (left) shows the original image and Figure 2 (right) the resultant image, where the projected laser is detected and marked with red dots. Then, the dot set is surrounded with a green rectangle (region of interest) that shows whether the image processing algorithm has correctly detected the projected laser.
If the measure lies outside the expected range, or it seems erroneous, the operator must confirm that this result is not due to a bad image acquisition. Since the system has been implemented, production quality has improved with axle diameters being measured at the required 30μm accuracy.
Dr. Angel Dacal-Nieto, Project Manager and Senior Researcher, Victor Alonso-Ramos, Head of Department and David Gomez, Senior Researcher, Automotive Technology Centre of Galicia (CTAG; Porriño Pontevedra, Spain; www.ctag.com)
Companies mentioned
Automotive Technology Centre of Galicia (CTAG)
Porriño Pontevedra, Spain
www.ctag.com
ABB
Zurich, Switzerland
www.abb.com
Goyo Optical
Saitama, Japan
www.goyooptical.com
JAI
San Jose, CA; USA
www.jai.com
Schneider Kreuznach
Bad Kreuznach, Germany
www.schneiderkreuznach.com/industrialoptics
Teledyne DALSA
Waterloo, ON, Canada
www.teledynedalsa.com


