How to build your own thermal camera for just over $150
DIY Thermal Camera – Build an Infrared Camera for Around $150
A new video published on the do-it-yourself YouTube page Blitz City DIY provides step-by-step instructions on how to build a thermalcamera using components that—in total—will cost just over $150 (USD).
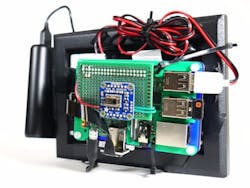
The camera is based on three hardware components, starting with a Raspberry Pi 3 Model B single board computer, which features a Quad Core 1.2GHz BCM2837 CPU, four USB 2.0 ports, CSI camera port for connecting a Raspberry Pi camera, DSI display port for connecting a Raspberry Pi touchscreen display, and more. An Adafruit HDMI 4 Pi 5" Display, with touch and mini driver, was also used. This features an 800 x 480 resolution display and USB-enabled 40-pin to 50-pin touchscreen adapter board.
Finally, an Adafruit AMG8833 IR thermal camera breakout is used to capture images. The AMG8833 features an 8 x 8 Panasonic infrared detector that when connected to the Raspberry Pi, returns an array of 64 individual infrared temperature readings. The camera will measure temperatures ranging from 32°F to 176°F. Additionally, Liz from Blitz City DIY used a cell phone power bank she had to power the camera, as well as a picture frame onto which the camera project is tethered.
"The AMG8833 is an Adafruit product and they have a great learning guide on it, showing you how to use it with both Arduino and Raspberry Pi," she explained in her post on Hackster. "I chose to use a Raspberry Pi because in the example code provided by Adafruit, it uses bicubic interpolation to basically make the image appear to have a higher definition and not look as pixelated. I wanted to setup the AMG8833 with the Pi as a camera that had a screen on the back and was handheld, portable and not tethered to a wall for power."
She also remarked on the completion and usability of the camera: "Overall, I’m pretty excited with how this project came out. It’s definitely something I’m going to be using in the future because I do a lot of benchmarking and looking at things like thermal readings, so to have a visual representation I can get on camera to get an idea of how things are behaving will be really cool."
View the YouTube video instruction.
View the Hackster article.
Share your vision-related news by contacting James Carroll, Senior Web Editor, Vision Systems Design
To receive news like this in your inbox, click here.
Join our LinkedIn group | Like us on Facebook | Follow us on Twitter
About the Author

James Carroll
Former VSD Editor James Carroll joined the team 2013. Carroll covered machine vision and imaging from numerous angles, including application stories, industry news, market updates, and new products. In addition to writing and editing articles, Carroll managed the Innovators Awards program and webcasts.
