System checks automotive gears
Andrew Wilson,Editor,[email protected]
Automotive gearboxes interconnect a complex set of mechanical parts, including constant mesh gear sets, synchronizer rings, dog clutches, and shifting forks. Should any part fail completely, the complete gearbox often needs to be re-built. During the manufacture of gearboxes, automotive manufacturers must therefore pay careful attention to the mechanical quality of each part before it is assembled into the finished gearbox. A major automotive company, Volkswagen (Kassel, Germany), builds several different gearboxes that use numerous types of gears. If the gear teeth are faulty, "grinding" can occur during shifting.
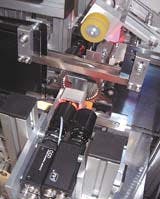
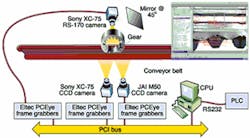
Volkswagen enlisted the help of HGV Vosseler (Oehringen, Germany), a specialist in integrating industrial image-processing systems and custom systems. HGV developed a vision system that uses a conveyor to carry gear wheels into the inspection workcell. After an initial reference run determines the starting point of the inspection and defines an acceptable gear tooth, the gears are inspected tooth-by-tooth using as many as four CCD cameras.
At the VISION 2001 trade fair in Stuttgart, Germany, HGV sales engineer Michael Koch explained how the system had been designed. "To image the integrity of each of the gear teeth," says Koch, "it was necessary to inspect the gear wheels from both sides as well as inspect the inside of the gear at each tooth point."
To image both sides of the gears, two XC-75 CCD cameras from Sony Deutschland GmbH (Köln, Germany) are mounted diametrically opposite the path of the gear on the conveyor belt. These images are captured using two PC-based PCEye frame grabbers from Eltec Elektronik AG (Mainz, Germany). To image the inside of the gear at each tooth, an M50 CCD camera from JAI Camera Solutions (Glostrup, Denmark) images the reflection from a mirror positioned at 45° to the horizontal plane. Images from this camera are digitized by a third PC-based PCEye frame grabber.
Rather than use off-the-shelf software to inspect the captured images, HGV uses its SMF-50 PC-based vision software. Via a graphical user-interface, the software measures the parameters of each gear tooth, checks the integrity of the gear teeth, and detects any damage. After each tooth is examined, the vision system triggers a programmable logic controller (PLC) to move the gear in a circular fashion so that the next tooth can be inspected.
The inspection process is then repeated until all the gear teeth are examined. According to Koch, this process takes approximately 20 seconds for each gear, depending on the number of gear teeth to be inspected. In addition to teeth inspection, the soldered joints on the gear wheel are also inspected. A good/ bad/rework switch guides the faulty gear wheels or associated plate bushings to the next processing step.


