Machine vision speeds light-tube inspection
Cortex Technical R&D Ltd. (Budapest, Hungary) has developed a multicamera inspection system for measuring the hot-formed ends of glass tubes used in the fabrication of fluorescent neon-light sources. The system uses a proprietary DSP-based UltraGrab frame-grabber card for image acquisition, enabling the measurement and sorting of glass tubes at a maximum rate of 250 pieces/min.
Designed for real-time industrial applications, the binary frame-grabber and image-processor PC-board is based on the ADSP-21XX DSP from Analog Devices (Norwood, MA; www.analog.com) and features a maximum image size of 800 X 576 pixels, the limit set by standard PAL (Phase Alternate Line) based video cameras. To make vision systems more compact, the board also includes optocoupled inputs and outputs, which can be directly connected to industrial controllers.
"For creating vision systems with the UltraGrab board, two software approaches can be taken," says Ákos György, president of Cortex. "Either the UltraGrab can be used as a stand-alone measurement system, where the PC provides power, initialization, and measurement supervision. This is ideal for simple applications, or when several DSP boards are configured in a single PC. For more complex systems, the DSP can perform computationally demanding routines invoked by the host."
A system based on this frame grabber has been installed at the General-Electric-Tungsram (Vác, Hungary) plant to check the hot-formed ends of glass tubes used in fluorescent lighting. The system measures the length of the glass tubes and checks to see if size differences exceed allowed limits. It also checks whether the tube end is broken or cracked and rejects faulty parts.
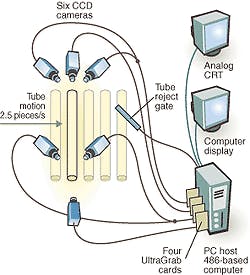
"Since tubes arrive at a rate of 250 pieces/min, human inspectors could not perform quality checking and could only roughly estimate the measurement parameters," says György. The tubes move continuously during inspection, and the parallel acquisition of images is taken on the fly. To inspect the tubes, each end of every tube is checked by four views using six CCD matrix and two linescan cameras (see figure).
An industrial PC equipped with the DSP-based UltraGrab frame grabber and image-processing boards interfaces the CCD matrix cameras to the host PC. All the image-processing tasks are carried out by the DSP boards with the PC acting as host, which provides a Windows-based graphical graphical user interface, statistics, calibration utilities, system-level controls, and diagnostics.
"Even an ideal end ring that appears as an ellipse to the system is distorted by several factors due to the position and wall thickness of the tube," says György. "And, because measurements need to be accurate to 0.004 in., compensation for these distortion factors must be accomplished in software, while at the same time the system has to be noise tolerant.

