CONSUMER PRODUCTS: Off-line inspection systems target nonwoven fabrics
In a presentation given at NIWeek 2010, Steve Rocke, a senior research scientist at Kimberly-Clark (Dallas, TX, USA; www.kimberly-clark.com), gave his insights into the benefits of deploying vision in off-line inspection. In addition to using on-line inspection systems to evaluate the quality of products such as bathroom tissue, diapers, and wet wipes, many quality tests are performed by operators using standalone image-processing systems.
Although this may sound surprising, the nature, speed of the production process coupled with an inability to achieve proper illumination, and lack of available space on production machines often means that on-line inspection for the properties of interest is not feasible.
“Even when using fast linescan cameras such as the 68-kHz Piranha2 from DALSA (Waterloo, ON, Canada; www.dalsa.com) on a web moving at 2000 ft/min means that approximately 150 μm of a web will pass under the camera in the time it takes to read out one linescan,” says Rocke.
And yet the quality of these products must still be evaluated. While in the past this was done manually, Rocke and his colleagues have now replaced this process with systems designed to inspect, among other things, the clarity of embossing on bathroom tissue, the pore size distribution of materials used in the construction of diapers, and the quantity of lint produced when using wet wipes.
Before embarking on the design of such systems, Rocke had a few words of warning for system developers faced with similar problems. “If there’s a button, it’ll get pushed; if there’s a knob, it’ll get turned; and if there’s a lever, it will get pulled,” he said, emphasizing the need to simplify user interfaces.
To determine the feasibility of evaluating the embossing clarity of bathroom tissue, Rocke was asked to develop a system that correlated well with data collected by human operators. The human evaluation of embossing clarity uses 15 trained evaluators who are each presented with good and bad reference samples and asked to grade other samples based on a range from 1 to 10. By correlating these data with data collected from an automated image-processing system, Rocke could then evaluate the effectiveness of his design.
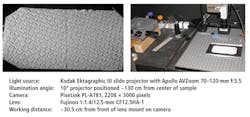
In the development of his system, a Kodak Ektagraphic III slide projector fitted with an Apollo AVZoom 70–120 mm f/3.5 lens was used to project light at a 10° angle onto samples placed approximately 30.5 cm under a PL-A781, 2208 × 3000-pixel FireWire camera from PixeLink (Ottawa, ON, Canada; www.pixelink.com) mounted with a 1:1.4/12.5-mm lens from Fujinon (see Fig. 1).
Pattern-matching tools in IMAQ Vision from National Instruments (NI; Austin, TX, USA; www.ni.com) then located embossments and compared them with a known good tissue featuring an optimal level of embossing. After measurement, each sample was assigned a Pattern Match Score; these data were compared with those collected by operators.
“Although data from the system correlated exceptionally well and was predictive of human response, a mill-friendly test system was not developed,” says Rocke. “Instead, our internal customer elected to purchase a system supplied by an external supplier.” Luckily, Kimberly-Clark was more amenable to the system Rocke and his colleagues developed to evaluate the porosity of a nonwoven material called spunbond, used in the manufacture of disposable diapers.
In the production of the outer cover of the diaper, a spunbond fabric is glued to a film and any bleed-through of this adhesive causes adjacent “wraps” of the laminate to stick together when wound on a roll. This, in turn, causes converting issues during diaper manufacture. The problem, referred to as “glue bleed-through,” is related to the porosity of the spunbond fabric.
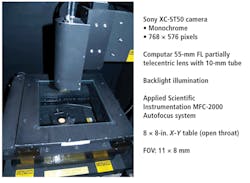
To determine this pore size distribution, Rocke developed an image-processing system using a 768 × 576-pixel XC-ST50 monochrome CCD camera from Sony Electronics (Park Ridge, NJ, USA; www.sony.com/videocameras) fitted with a 55-mm partially telecentric lens from Computar (Commack, NY, USA; www.cbcamerica.com) mounted above an 8 × 8-in. X-Y table (see Fig. 2).
FIGURE 2. In evaluating the porosity of the outside layer of diapers, a CCD camera was mounted above an X-Y table and backlit images of the diaper transferred to a host PC. Any glue bleed-through appears as a series of blobs, which are then measured, and an area weighted mean equivalent circular diameter (AWECD) calculated.
Using an MFC-2000 Autofocus system from Applied Scientific Instrumentation (Eugene, OR, USA; www.asiimaging.com), backlit images of the diaper layer from the system’s 11 × 8-mm field of view were then transferred to a host PC.
Using background correction, sharpening, calibration, and filtering tools within IMAQ Vision the area and “equivalent circular diameter” (ECD) of each pore was measured. ECD is a commonly used expression of pore or particle size, and is the diameter of a circle having the same area as the blob being measured. However, “because larger particles will have a greater influence on the amount of glue passing through the spunbond,” says Rocke, “an area weighted mean ECD (AWECD) provided a more accurate measure of the spunbond’s porosity.” AWECD is calculated by Sum(areai * ECDi)/Sum(Areai).
By using different amounts of glue at different pressures, the system could then be used to determine the optimal glue amounts and pressure required.
Through a series of experiments, the AWECD measurement was shown to have strong correlation with glue bleed-through. According to Rocke, the system is currently employed by Kimberly-Clark for pore-size distribution product release testing in several of the company’s facilities.
As a worldwide manufacturer of baby wipes, Kimberly-Clark also needed a way to quantify the amount of lint generated when the wipes are used. “In Asian countries, in particular,” says Rocke, “mothers do not like to see lint generated when these wipes are used on their offspring.”
To quantify the amount of lint generated for any given sample, Rocke and his colleagues developed a test that simulated how this lint was generated. To accomplish this, a Digital Ink Rub Tester from Testing Machines Inc. (TMI; New Castle, DE, USA; www.testingmachines.com), originally developed to measure scuffing or rubbing resistance of ink on paper, was used.
After subjecting baby wipes to rubs of various forces and speed, wipe samples and the lint contained on them were digitized using a ConoScan 8800F scanner from Canon (Lake Success, NY, USA; www.usa.canon.com). Blob analysis then determined the size of the lint particles. This low-cost lint quantification system is in use worldwide.
Vision Systems Articles Archives


