On-line inspection ensures needle quality
Off-the-shelf cameras and machine-vision software measure pharmaceutical-needle sharpness.
By Andrew Wilson, Editor
In the competitive medical-instruments market, manufacturers are under increasing pressure to produce higher quantities of products at greater speed while maintaining product quality. For the manufacturer of automated production systems, the complex design of pharmaceutical products and the cleanroom and space constraints in which they must operate can pose special problems. Medical-system designers continually seek ways to allow simpler, more precise, reliable delivery of medication such as insulin.
Insulin was discovered by Nobel Prize winners Charles Best and Frederick Banting in February 1922, and the first insulin syringes were modified glass syringes with a scale in units of insulin. The steel needles were detachable, and both the syringe and needle were sterilized by the patient following each use.
After the introduction of disposable syringes in the 1960s, a number of manufacturers, including Ypsomed, introduced insulin syringe pens. Pens allow patients to perform self-injection. These pens are used with medications, such as insulin, which, because of their chemical structure, require subcutaneous or intramuscular injection. The reusable, variable-dose pens are manufactured from a number of individual parts including pen needles, pen bodies, and a pen cover.
In producing the needles used in these pens, stainless steel between 6 and 12 mm in length is ground to a primary angle and then a sharper secondary angle. The needle is rolled to provide maximum sharpness. These needles must be mounted precisely in a small plastic housing, covered, and packaged for delivery to the customer. Before delivery, the needle and plastic housing, known as a cannula, must be rigorously inspected to ascertain the sharpness of the needle and its position in the housing. To find a system to do this automatically, Ypsomed turned to sortimat Technology, a specialist in the design and manufacture of feeders and assembly machines for medical products that generated sales of $55 million in 2003, according to Hans-Dieter Baumtrog, managing director.
IN THE CANNULA
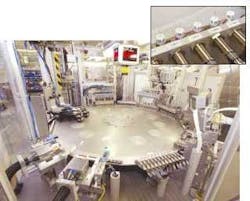
“One of the greatest challenges in developing an automated system to produce cannulas,” says Baumtrog, “was meeting the stringent quality demands placed on the product by the US Food and Drug Administration (FDA) while maintaining a throughput of approximately 480 parts/minute.” Engineers at sortimat opted for a rotary-indexing-table design that uses pick-and-place workcells to feed, assemble, and test each part (see Fig. 1).
The sortimat cannula assembly and inspection system is a rotary indexing table more than 8 ft in diameter with nine workcells and individual pick-and-place and inspection stages. Pretested cannula housings are loaded, 12 pieces at a time, into a linear housing at the perimeter of the rotary stage. After the plastic bases are loaded, the table is indexed to the next inspection station where their physical presence is ensured using a series of 12 inductive sensors. The table is indexed again, and six needles are automatically placed into the first six plastic base carriers by a pick-and-place machine.
“To attain the throughput required by Ypsomed,” says Olaf Witzel, an engineer at sortimat, “it was necessary to place the needles in the plastic bases in two separate stages.” After again indexing the table, another six needles are placed into the array of plastic bases. “Thus, four separate stages are required to load, place, and assemble the bases and the needles into 12 cannulas.
After verifying the presence of the needles using a series of inductive sensors, the needles and bases are sealed by two custom-built heating stations. To maintain the throughput requirements, two separate stations seal six individual needles at a time into their plastic bases. The integrity of the tips of each individual needle housed in the cannula must then be inspected.
To inspect 12 needles within 1.5 s required a vision system that was fast, nonintrusive to the operator, and capable of examining randomly oriented parts. Several methods could have been used to do this. Because all 12 needles are only presented to the final inspection stage for 1.5 s, sortimat engineers needed to develop a sophisticated, yet relatively low-cost machine-vision system that could inspect needle smoothness, tip quality, bending, and length.
“Limited space within the work area also presented challenges for the design. Because the 12 needles are only a few centimeters apart on the test fixture,” says Witzel, “it was impossible-and would have been rather expensive-to mount 12 separate cameras to perform image capture. Because parts are randomly oriented as they are presented to the vision system, it is also impossible to know the orientation of the tip of each needle. While some needles may be presented in the correct orientation, it is more than likely that most will not be presented correctly. Thus, if a single camera was used to capture the images, specific features of the needle including the tip angle (a measure of sharpness) may not have been captured.”
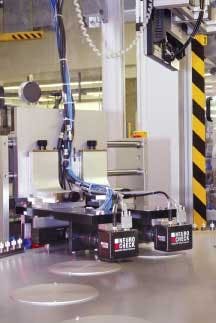
To solve these problems, sortimat called on the application engineers at NeuroCheck to develop a way of imaging the needles while maintaining the production speed of the rotary indexer. In their design, two Baumer Optronic FWX-14 1392 × 1040 × 8-bit gray-scale cameras are rigidly mounted approximately 6 in. apart on a movable mechanical axis (see Fig. 2). Mounted above and inside the rotary indexer, these two FireWire cameras were fitted with telecentric lenses from Sill Optics.
In applications such as needle-straightness and tip measurement,” says Dirk Zinnaecker, NeuroCheck engineer, “correct and consistent distances must be determined very accurately.” Because telecentric lenses feature a constant magnification as the distance from the lens changes, they allow a camera to capture a correct image perspective over a change in height or a change in slope of the part. To measure specific needle parameters, images from both cameras are transferred to an industrial PC from Pyramid Computer Systems over the FireWire interface.
To image the individual needle tip at the proper orientation, NeuroCheck mounted the cameras and lenses behind a custom-built prism system (see Fig. 3). Images of each individual needle are viewed through an optical system that allows two views at ±45° of each needle. This optical system consists of two red 30 × 40-mm backlights from CCS America and a custom prism and optical mirror mounting. Interestingly, because images need to be captured at 100-μs intervals, NeuroCheck built its own strobe lighting driver to pulse the LEDs.
FIGURE 3. Because parts are randomly oriented as they are presented to the vision system, it is impossible to know the orientation of the tip of each needle (left) To properly image an individual needle tip at the proper orientation, sortimat mounted the cameras and lenses behind a custom-built prism system. Images of each needle are viewed through an optical system that allows two views-each at 90°-of each needle (right). When viewed though each camera, captured images reveal a reference pin placed on the linear housing and two views of each needle, each at 90° to each other.
The cameras, optical housing, and lighting are moved across the field of view of the cannulas. By allowing each individual camera to view six devices in a linear fashion, the 480-part/minute inspection rate is maintained.
PINPOINTING DEFECTS
When viewed through each camera, captured images reveal a reference pin placed on the linear housing and two views of each needle at 90° to the other. The reference image, known to be straight, is used as a reference point with which to measure the straightness of the needle being examined. “Because each image is known to be at 90°,” says Zinnaecker, “it is possible to calculate mathematically the maximum bending angle of each needle.”
Special software
Using NeuroCheck machine-vision software, images from both the FireWire cameras are transferred to the industrial PC. The company developed a tailored package that computes the curvature of the needle tips and checks them for sharpness against given tolerances. At the same time, a custom-developed algorithm determines the angle of each needle, returning a result for its bent.
Once these values are calculated and compared against reference values, a pass/fail value is computed and transmitted over a PCI-based Profibus controller from Hilscher to a programmable logic controller. After indexing the rotary table to its final stage, individual good and bad parts are sorted.
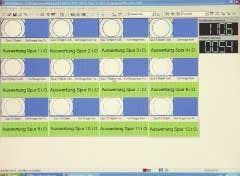
Cannulas are then automatically transferred to a second rotary indexing table. Here, the centricity of each needle within each cannula is checked with two overhead cameras mounted above one of the stages of the indexing table. PC-based NeuroCheck software is again used to check the dimensional accuracy and tolerance of each part (see Fig. 4). After parts are checked, the rotary table is indexed through a number of stages where covers are placed over the needles. Finished cannulas are individually wrapped and sealed and shipped to pharmaceutical-distribution companies worldwide.
This year, sortimat expects to ship three such product lines to Ypsomed, at a cost of between €2 million and €3 million. “Although the machine-vision part of the system was only approximately 7% of the total cost,” says sortimat’s Baumtrog, “it plays a vital part in ensuring that these products comply with US FDA specifications.”
Company Info
Baumer Optronic, Radeberg, Germany www.baumeroptronic.de
CCS America, Waltham, MA, USA www.ccsamerica.com
Hilscher, Hattersheim, Germany www.hilscher.com
NeuroCheck, Remseck, Germany www.neurocheck.com
Pyramid Computer Systems, Freiburg, Germany www.pyramid.de
Sill Optics, Wendelstein, Germany www.silloptics.de
sortimat Technology, Winnenden, Germany www.sortimat.com
US Food and Drug Administration, Rockville MD, USA www.fda.gov
Ypsomed, Burgdorf, Switzerland www.ypsomed.com


