Image processing checks cans
Custom software and lighting combines with off-the-shelf imaging components to inspect beverage-can ends.
By Helmut Gruber
One of the largest manufacturers of beverage cans, Ball Packaging Europe, has 12 factories in Europe that produce can bodies and ends. Its factory in Braunschweig, Germany, produces several billion can ends a year. Each machine in Braunschweig manufactures 2400 aluminum can ends a minute in a process that involves several stages. First, blanks are punched from an aluminum coil and each end is molded into shape. Then the end is molded in successive steps, and the tab, which is molded simultaneously, is attached to the end.
Before they are packaged, every converted end must be inspected. In the past, inspection systems offered only limited capabilities in inspection, performance, and data generation, for example. Ball Packaging called on Quiss to develop a machine-vision system, which it calls TCVision, to inspect each part as it is produced and provide feedback to the company’s statistical process-monitoring systems.
Using image-processing components from Stemmer Imaging, the Quiss system checks the ends for problems such as deformation, scratches, contamination, burring, dents, and other flaws. In addition, the system verifies the rotation of the tab, the overall diameter, and the rivet diameter. A combination of checks involve contour and surface analysis as the ends run past the inspection stations on three parallel lanes at a speed of approximately 800 can ends a minute per lane. For some criteria the detectable tolerances are as low as micrometers.
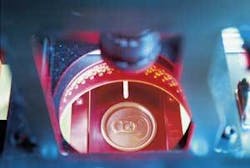
Up to four images of each end are taken by an M10 progressive-scan CCD camera from JAI Camera Solutions to detect particular features with dedicated optical stations. Images are then digitized into a PC-based system using PC2Vision frame grabbers from Dalsa Coreco. The cameras operate under a zero-force liftable cover that also includes custom LED strobe lighting developed by Quiss (see Fig. 1).
The system can be adapted for different requirements and inspection operations. It can detect flaws on the ends, reject flawed parts, and shut the press down immediately when certain defined types of flaw occur. In the case of slight flaws, the system can be programmed to permit a certain ratio of parts per thousand to pass through the production process. Serious flaws can be defined as criteria for an immediate shutdown. Defective parts are always rejected.
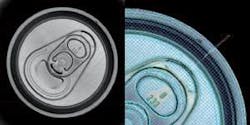
The custom TCVision analysis software checks the test object with a contour model based on a CAD drawing. Deviations from the required contour and flaws in the surface can be detected even in the subpixel range (see Fig. 2). Consequently, a nearly unlimited amount of inspections of dimensional and positional accuracy of contours and surfaces of all shapes can be processed. This type of analysis permits repeatable detection of defects and makes it possible to check other designs such as gold-colored can ends or other variants with different surfaces without adapting inspection settings.
Application software lets the user create new product types or alter the inspection parameters in real time. Contours are detected by the system in advance, and the user selects the contours to be inspected. The user can assign them go/no-go criteria such as the maximum size of scratch that can be tolerated or the maximum and minimum rivet diameter. The system can thus learn arbitrary freeform areas and curve geometries within a short space of time.
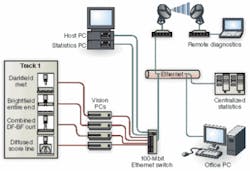
With a network connection, parameter sets and images can be loaded from the production process, analyzed, and optimized offline. Updated settings can be reloaded to the production system without interrupting production. Since all the PCs in the TCVision system are networked, the system can be monitored and controlled remotely. Thus, details such as inspection settings can be transferred to all the manufacturing lines automatically (see Fig. 3).
In addition, the production process can be optimized and documented on the basis of the data obtained in the inspection process. The system offers various statistical functions for the visualization and data analysis of the inspection results. Results of the analysis over time can be displayed in several views including bar charts or distribution charts that show the proportion of faults in error classes. Markers indicate the time and date of system interventions so as to show the effects of parameters changing on the results of the checks.
By assigning statistical functions, filter criteria data related to lines, stations, or faults can be extracted and displayed. Warning thresholds can also be set and displayed statistically. By issuing an increasing number of these warnings, TCVision provides timely notification of changes that occur in the process and advises the user to inspect the production process before rejects are produced.
In addition to providing 100% documented quality, the analysis and visualization functions of TCVision allow nontolerable variations that take place in the process to be recognized quickly. On the basis of its positive experience with the system in Braunschweig, Ball Packaging Europe has decided to use TCVision in its other factories. Companies such as Crown Bevcan UK and Lotte also have successfully deployed Quiss inspection systems.
Helmut Gruber is sales director packaging, Quiss (Puchheim, Germany; www.quiss.com).
Company Info
Ball Packaging Europe
Ratingen, Germany
www.ball-europe.com
Crown Bevcan UK
Carlisle, UK
www.crowncork.com
Dalsa Coreco
St.-Laurent, QC, Canada
www.imaging.com
JAI Camera Solutions
Glostrup, Denmark
www.jai.com
Lott
Osan, South Korea
www.lotteal.co.kr
Quiss
Puchheim, Germany
www.quiss.com
Stemmer Imaging
Puchheim, Germany
www.stemmer-imaging.de


