Sensor checks auto-switch assemblies
Camera-based sensor helps automate removal of defective parts and eliminates manual inspection of brass strips.
By David Fletcher
Camera-based vision sensors are helping automate the inspection and quality control of manufactured parts. In recent years, these vision sensors have evolved to become a reliable high-speed replacement for manual inspection, also offering manufacturers a cost-effective solution compared to PC-based machine-vision systems.
Wiegel Tool Works, a metal-forming company, developed a low-cost vision-sensor system to address a difficult inspection and sorting challenge on a brass automotive-switch subassembly. The company quarantined a significant quantity of the formed-metal strip in the switch after discovering a manufacturing defect that had been caused by a timing issue in the brass-strip feed process.
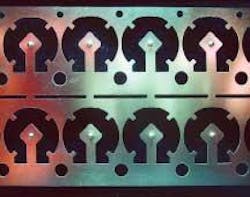
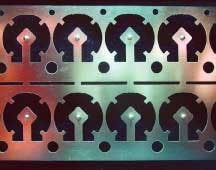
The specific cause of the defect was a metal punch that intermittently clipped the left edge of a formed dimple on the brass strip, thus reducing the amount of contact area in the final product (see Fig. 1). The discovery of the defect meant that the company had to perform a separate quality-control inspection of each reel of the finished production lot of 25 reels. Each reel held a 360-foot-long brass strip, and the total lot contained approximately 10,000 dimples. Once located, each defective dimple had to be cut out.
Engineers at Wiegel attempted to use two in-house machine-vision systems for the task but could not tailor them for the inspection. As a result, the company found itself faced with the potential manual inspection of more than 250,000 parts with microscopes.
SENSOR SOLUTION
Wiegel Tool Works had already purchased the camera-basedPresencePLUS Pro vision-sensor system from Banner Engineering for another application. Ed Andrews, director of quality for Wiegel, felt this vision sensor might be the solution, but because the application involved the inspection of completed parts on reels, the challenge involved a large degree of application engineering.
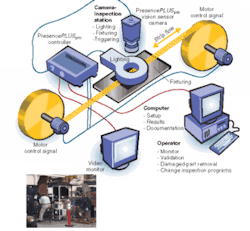
After bench-testing samples of damaged strips, Banner Engineering recommended an applied component and programming approach to solve the sorting/ inspection task. The quality department at Wiegel constructed a temporary inspection area consisting of two reel-coiler/uncoiler stands located on each side of a hooded camera inspection fixture. The overall process was to unreel the strip and inspect one of two formed contact pad dimples, then reverse the strip flow to inspect the second dimple and rewind the strip onto the original reel (see Fig. 2).
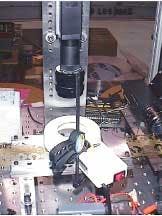
ThePresencePLUS Pro system included a PPCAM progressive-scan camera with 640 × 480-pixel, 1/3-in. CCD with LVDS interface and standard C-mount. It was mounted 4 in. above the brass strip, and a Tamron 50-mm-focal-distance lens with a 40-mm extension tube was used to achieve a field of view of approximately 0.200 × 0.200 in. (see Fig. 3). The camera mount bracket was part of a precision microslide constructed by Wiegel's tool room sensor specialist Bud Giacone. With this fixture, the operator could move the camera forward and backward the necessary 1.250 in. to center around each of the dimples on the side of the strip being inspected. Since the Banner PresencePLUS Pro fluorescent ringlight also needed to be moved for each directional pass, a hand clamp was used to fix the light directly above the brass strip guide.
Wiegel used an opposed mode set of individual plastic fibers connected to a Banner D10DPFP photoelectric sensor to create a through-beam sensor that triggered the inspection based on pilot holes located every 3/4 in. along the edges of the brass strip. The process required a directional flow of the brass strip to pass from left to right in the first pass and then a reversal of right to left in the second pass. One trigger pilot hole was the leading edge and the next the trailing edge.
PresencePLUS Pro Controller PPCTL contains a PowerPC chip; includes Ethernet, serial, and flexible I/O interfaces; and can store multiple programs. The multiple program capability allowed Weigel to create distinct inspection profile programs for each directional pass of the brass strip. By mounting the ringlight directly above the fixture, a dark-field condition for the top of the dimple was created with a corresponding light field condition for the dimple's vertical conical sides.
To develop the two inspection profile programs, the suite of inspection tools incorporated within thePresencePLUS Pro development software facilitated an inspection process that identified out-of-spec parts. The Pattern Find Locate Tool found the dimple within the image view, followed by the Object Tool, which was applied across the dark-field top of the dimple. The Test Tool reported a failed output if this dark circle was undersized, a condition indicating a clipped or damaged dimple.
INSPECTION PROCESS
Once the process was firmly established, the inspection time and any necessary manual intervention ran about 30–40 minutes per reel to inspect both rows of the formed dimples. Although the process was run quite slowly in terms of the vision sensor's capabilities, the reeling and unreeling equipment controlled the speed of the operation.
To facilitate removal of any damaged pieces from the strip, the team applied one of the six programmable outputs from the PresencePLUS Pro controller to activate the stop controls on the reelers. Since Wiegel Tool uses standard pressroom feed reelers, contact arms are typically applied to start and stop the strip depending on the feed loop height.
With the addition of an interposing Turck ice-cube relay, a path was completed to ground, which facilitated stopping the strip feed when an inspection failure occurred. When the feed process was stopped, a 9-in. video monitor connected to the controller displayed the failed image, and the Wiegel Tool employee could verify or validate the condition. If a damaged part was found, it was cut from the strip and the process restarted.
QUALITY AND DELIVERY
Even with the speed limitations of the reeling equipment and interruptions to remove defective subassemblies from the strips, Wiegel Tool Works could inspect 100% of every spool at a rate of 150 parts per minute. Weigel's Ed Andrews reports that manual inspection of each dimple with microscopes would have yielded inspection rates no better than 20 parts per minute.
Andrews added that some of the tested reels had numerous defective parts, and the entire reels were scrapped. However, most reels revealed only one or two defective parts that were identified and removed prior to shipment. From the production lot in question, Wiegel Tool was able to maintain their zero-tolerance quality expectations and meet a firm shipment date for its long-standing customer.
"The effectiveness of the vision sensor not only saved time and freed up our quarantined product," say Andrews, "it provided a level of documentation to support the inspection validation to our customer. Defective parts were marked with the reference frame number from the saved log file captured with thePresencePLUS Pro document capability. These images and data files were saved and utilized for analysis and continuous process improvement at Wiegel Tool Works."
DAVID FLETCHER is Chicago-area sales manager for Banner Engineering, Minneapolis, MN, USA; www.bannerengineering.com.
Company Info
Banner Engineering, Minneapolis, MN, USA www.bannerengineering.com
Tamron USA, Commack NY, USA www.tamron.com
Turck USA, Minneapolis, MN, USA www.turck-usa.com
Wiegel Tool Works, Wood Dale, IL, USA www.wiegeltoolworks.com


