Vision system checks auto axle assemblies
By Dan Romanchik,Contributing Editor
Because automotive manufacturing deals with high production volumes, automotive suppliers must satisfy both the automakers' demands for low prices and customers' demands for high quality. On many automobile-production assembly lines, a manual parts-inspection system cannot meet both of these demands. Accordingly, an automotive-axle manufacturer initiated a study effort to improve product quality and reduce production costs on a major parts assembly line. The study results disclosed that a smart vision system could perform an automatic and accurate inspection of the axle's transfer case and satisfy higher-quality and lower-cost requirements.
Although the existing manual process for inspection of automobile axles seemed sufficient in overall performance, it was still relatively slow and prone to errors. For example, the process required test technicians to scan a label on the transfer case, open a plug and check for the presence of oil in some models, and then manually input computer data after the inspection was completed. This process consumed several minutes of production time, and the technicians frequently made typographical errors when they entered the axle type and inspection results into the database computer.
To overcome these problems, the manufacturer hired Quantum Controls Inc. (QCI; Plymouth, MI) to develop a smart vision system. This system was required to do automatically all the tasks that the technicians previously did manually. These included determining which type of axle assembly was on the line, checking whether or not the axial transfer case contained oil, and delivering production data to the programmable logic controller (PLC) that governed the assembly line.
After detailed production-line and vision-system design investigations, Emad Alnajjar, QCI project engineer, chose an off-the-shelf industrial computer to control the inspection system. This relatively inexpensive but reliable computer contained a Pentium III processor, 64 Mbytes of RAM, and a 4-Gbyte hard drive. Because the computer system could be located 50 feet away from the production line or any hazard, ruggedized packaging was not required.
The computer also houses a National Instruments IMAQ-1408 frame-grabber board. This board supports up to four video inputs, can acquire monochrome or still-color images, and handles variable scan rates from 5 to 20 MHz. It also provides four digital input/output (I/O) lines that can be used to trigger image acquisition; however, these I/O lines were not used in this particular application.
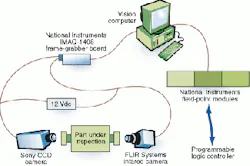
The axle-assembly vision-inspection system uses two cameras: a Sony Electronics Inc. (Park Ridge, NJ) CCD XC-75 camera and a FLIR Systems Inc. (Portland, OR) Thermovision Alert MV infrared camera (see Fig. 1). The Sony CCD camera is positioned on one side of the assembly line to acquire an image of the axle assembly. Lighting for this inspection application proved not to be critical. An inexpensive off-the-shelf fluorescent ringlight proved sufficient.
The infrared camera determines the heat signature of the assembly. This heat signature establishes whether or not the transfer case is filled with oil. During operation, the infrared camera provides an RS-170 EIA/NTSC video output to to the IMAQ frame grabber board. Because this camera is air-cooled, it did not need an expensive water-cooling subassembly. Its serial port delivers text strings for command control purposes using either the LabView drivers supplied by FLIR or via the serial port functions contained in LabView. These commands are used to calibrate the camera in setup mode and to trigger image acquisitions.
FIGURE 1. PC-based vision inspection system uses two cameras: a CCD camera to determine the axle type and an infrared camera to determine whether the axle's transfer case contains oil. It interfaces with the assembly line's programmable logic controller via digital input/output lines.
To communicate with the PLC controlling the assembly line, the inspection system uses National Instruments' FieldPoint industrial-grade digital input and output modules. For example, an FP-DC130 module offers eight digital inputs and an FP-RLY-422 module provides four digital outputs.
The PLC signals the inspection system to begin the process via the digital inputs. Two of the digital inputs inform the system which type of axle assembly to expect; a third digital input notifies the system when the axle is in place. When an inspection is completed, the system uses the digital outputs to report the results. Two of the digital outputs instruct the PLC which type of axle was inspected; a third digital output signal reports whether the axle passed or failed the inspection.
For system software support, Alnajjar chose National Instruments' LabView software. This software includes drivers for the IMAQ frame grabber and comes with built-in image-processing functions. It enabled the QCI designers to quickly develop the application and the graphical user interface.
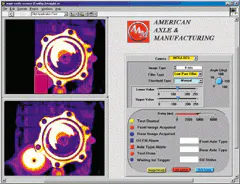
The inspection system's graphical user interface presents two screens: a setup screen and an inspection screen. The setup screen—which is password-protected—allows test technicians to account for changes in system parameters, such as lighting conditions and camera location (see Fig. 2). It also allows technicians to add new axle-type information into the system as the parts are introduced.
The setup screen is divided into two main displays. The left display shows two images from the front and the rear axles. The top right portion of the front panel display shows the image-processing controls. Using these controls, the test technician can rotate images, zoom in or out, and set image thresholds. The lower right portion presents test status and test result indicators.
The inspection screen shows only the two acquired images and a test result indicator. This screen is much less detailed than the setup screen because its purpose is just to help technicians monitor the tests. Alnajjar did not want to give technicians the ability to change test-system parameters.
During operation, the first task of the inspection system is to determine the type of axle being inspected. The manufacturer produces four different axle types on the same assembly line. Two of these axles have a circular shape with different diameters, whereas the other two axle types have a nonuniform star-type shape with different diameters.
The vision inspection system uses LabView's image-enhancement, shape-matching, and measurement tools to determine the axle type. After enhancing the images, the system draws a region-of-interest (ROI) "line" across the outer parameter of the axle surface. Then, it calculates a perpendicular ROI "line" and displays this line on the image. By measuring the length of the line across the edge of the axle and comparing it to a reference length, the system identifies which type of axle is under inspection.
The last step is to inspect for the presence of oil inside the transfer case reservoir using the infrared camera. After the system acquires the image, it looks for a hot spot in the image. The light intensity of the hot spot is compared to a reference level for the particular axle type under inspection, and the result determines the presence or absence of oil. If the axle fails the inspection, the system alerts the technician to take corrective action.
FIGURE 2. Graphical user interface of the vision inspection system displays two screens—a setup screen (left) and an inspection screen (right). The setup screen-which is password-protected-allows test technicians to account for changes in system parameters and add new axle types. The inspection screen shows the acquired images and a test result indicator.
After the inspection is completed, the system reports the results to the PLC, including the type of axle and whether or not it passed inspection. It also keeps a running total of the test results data.
A major system design concern was the amount of time needed to perform an inspection. The assembly line is set up to run at three axles/minute; that is, all of the inspections have to be done within 20 s. Alnajjar notes that the time needed to acquire the images and perform the calculations is on the order of 2 to 5 s, well within test limits. This short time permits the manufacturer to speed up the assembly line, if necessary, without having to add an additional inspection system.
Overall, this vision inspection system has exceeded all of the design requirements. Although the system cost $80,000, it has proven to be more reliable and accurate than the replaced manual inspection system. Moreover, labor costs were greatly reduced as the system runs 24 hours a day, seven days a week, with little manual intervention.
Company InformationFLIR Systems Inc.Portland, OR 97224Web: www.flir.comNational Instruments Corp.
Austin, TX 78759
Web: www.ni.com
Quantum Controls Inc.
Plymouth, MI 48170
Web: www.quantumone.com
Sony Electronics Inc.
Park Ridge, NJ 07656
Web: www.sel.sony.com/


