Boxed Set
Components within automotive door handles are inspected by a vision system based on six FireWire cameras
Coupled with the increased demand for quality from automotive manufacturers, modern door handles are no longer simple mechanisms but integral components of electronically based locking systems. To build these handles, suppliers to the automotive industry use a combination of production processes that include pressure die casting, injection molding, painting, and assembly of the final unit. All of these processes require meticulous attention to achieve the quality levels expected of a tier-1 automotive supplier. After each door handle is manufactured, final inspection of the assembled unit and kit of handles used on each car is critical prior to the product leaving the factory.
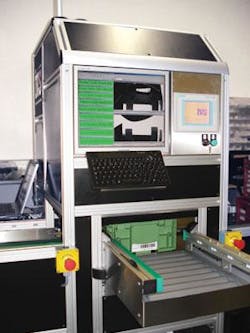
Because of this, Huf UK, an automotive-door-handle OEM, approached Industrial Vision Systems (IVS) to automate the process for inspecting these parts (see Fig. 1). As a sister company to NeuroCheck, IVS designs and manufactures machine-vision systems for the electronics, pharmaceutical, medical-device, food, printing, and automotive industries. Since Huf UK produces an average of 100,000 keys or ID devices, 60,000 door handles, and 24,000 steering-column locks each day, the quality of these manufactured products is critical to its success.
Key criteria
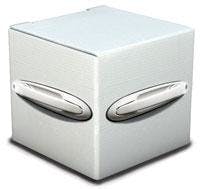
Automotive handles are sent to the customer in rigid boxes with an in-fill foam insert designed to take a combination of handle types. These boxes are returned to the supplier once the handles have been put on the car and the box reused.
As part of the final automatic inspection, Huf UK required a machine-vision system that could perform several inspection tasks. Since an automotive handle is made up of a number of constituent parts including the main body, a buffer insert, and a clip, all of the parts are critical to its effective operation. Add to this the number of color variants of each handle available along with the number of two-door/four-door, lefthand/righthand combinations that comprise a complete car handle pack, and it is obvious that the final inspection is critical to guarantee the correct components reach the customer.
The vision system was required to check a number of key criteria. First, the system must determine whether the correct combination of parts is present in terms of lefthand/righthand handles and locking/nonlocking parts. Individual components of the handle must also be checked to confirm they are seated correctly in the handle and have not deviated out of position, including the handle buffer and clip. Each type of handle must also be checked against a manifest sheet, and the positioning of the parts within a packaged box must be ensured before final delivery.
Handling parts
The machine design was based on a manually loaded station with an automatic conveyor that presents each box to a number of vision-system cameras. If the handles are found to be defective, they are routed onto another conveyor for rework, while good parts are passed along an outfeed for shipping to the manufacturer.
As each box of handles enters the inspection system, a proximity switch interfaced to a PLC halts the conveyor belt, positioning the box in the center of the machine. Here, the barcode located on the side of the box is read by the vision system. This provides the information for each specific handle set to the PLC, which, in turn, initiates the correct check routine within the vision system for inspection of the particular handle type.
IVS chose a conveyor system from Bosch Rexroth, which was built into a custom-designed framework. The machine had to accommodate the loading and unloading by operators, along with the required tooling and fixtures for housing the vision-system components and associated LED lighting.
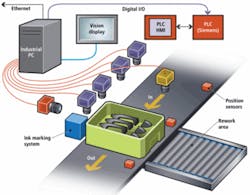
As the vision inspection area was purposely designed to stop the ingress of ambient light, lighting levels could be controlled by automatically switching the lighting arrays as required. Six cameras were mounted into the canopy over the conveyor: five medium-resolution FWX06c digital FireWire Cameras and one high-resolution FWX20 digital FireWire Camera. While the high-resolution camera was used for label inspection and reading of the barcode on the side of the box, the medium-resolution cameras were used for general inspection processes that included the correct presence of the handle and deviations of subcomponents within the handles (see Fig. 2).
To illuminate the parts within the boxes, four high-intensity, 280-mm white LED line lights were mounted obliquely to the box being inspection. These lighting units and camera lenses included a polarizing filter to reduce glare and reflections from the metallic painted parts.
To inspect captured images, the vision system, controlled by NeuroCheck machine-vision software, communicates with the cameras, performs the machine vision inspection to confirm the acceptance or rejection of the part, and communication with the internal machine PLC and the factory information system. Two industrial PC units are integrated into the machine: one is the master and the second acts as an available backup in case of failure of the master PC. An S7-200 PLC from Siemens communicates with the vision system over a Profibus network, and a Siemens PLC HMI interface is integrated into the front panel of the machine for overall control and on-going maintenance of the machine.
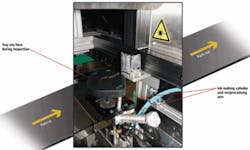
Following the inspection process the machine automatically marks a good part with an ink marking system (see Fig. 3). This is verified to check that it has been marked correctly by the vision system before traveling down the pass conveyor. The manifest is also logged to the factory information system so it has been recorded as passing final inspection.
Statistical analysis
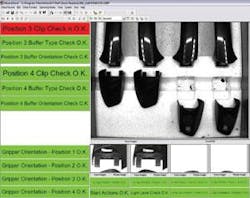
NeuroCheck software provides a graphical user interface to display images and the results of each inspection (see Fig. 4). As each box is inspected, the operator is presented with an image of the box and the highlighted search regions. The results of each pass or fail are displayed, as well as a running total of the number of handles inspected and passed by the software. Because this information is stored in a standard database format, it can be networked to existing database systems to provide management about the integrity of each system in the production process. This information can be transferred from the system’s PC using a standard Ethernet interface.
Since the machine offers a robust method for automatic final inspection of every handle leaving the factory, product quality of ever part is assured. As every box is logged against the factory information system, a historical database of information relating to quality and ongoing statistical process control is obtained. Ultimately, the tier-1 supplier can guarantee the quality of products leaving the factory to its customer.
Earl Yardley is director of Industrial Vision Systems, Kingston Bagpuize, UK; www.industrialvision.co.uk
Features, advantages, benefits
“The vision-system machine manufactured by Industrial Vision Systems has provided us with end-of-line quality control to keep our PPM to a minimum, giving our customers the confidence that we can deliver high-quality product every time,” say Julian Dawes, quality and technical manager at Huf UK. “The NeuroCheck machine-vision software has proved to be an effective and usable tool, offering us a flexible approach to automated inspection. IVS was a knowledgeable and well-managed team that provided us with a vision system that is reliable and robust.”
